

A crochet ear warmer can be as simple as a low-profile textured band or as decorative as a turban-style wrap covered in dimensional stitches. That difference matters when you are deciding what will fit comfortably under a hood, show off a favorite yarn, coordinate with glasses, or make enough of a statement to replace a hat.
These 15 crochet ear warmer ideas cover noticeably different constructions and surfaces, including twist fronts, cables, Tunisian crochet, puffs, bobbles, chevrons, C2C fabric, raised post stitches, and decorative accents. Instead of choosing by color alone, compare how each design handles stretch, front bulk, texture, and finishing. The goal is to help you choose a construction that matches how you actually plan to wear it.
Quick List
- Crochet Classic Twist Ear Warmer
- Crochet Tunisian Cinch Ear Warmer
- Crochet Sculpted Cable Ear Warmer
- Crochet Crunch-Stitch Everyday Ear Warmer
- Crochet Double-Puff Ribbed Ear Warmer
- Crochet Wide Cinch Ear Warmer
- Crochet Lemon-Peel Ring Ear Warmer
- Crochet Herringbone Texture Ear Warmer
- Crochet Alpine-Panel Ear Warmer
- Crochet Ribbed Turban Ear Warmer
- Crochet Diagonal C2C Ear Warmer
- Crochet Flower-Accent Ear Warmer
- Crochet Heart-Bobble Ear Warmer
- Crochet Chevron Ridge Ear Warmer
- Crochet Raised-Arrow Ear Warmer
How to Size a Crochet Ear Warmer Without Making It Uncomfortably Tight
Head circumference is only one part of ear-warmer sizing. The finished crochet fabric also has to stretch comfortably and recover without feeling loose. Ribbing, Tunisian fabric, cables, bobbles, and dense textured stitches can behave differently even when two bands have similar resting measurements.
Measure around the area where the warmer will actually sit rather than relying only on a generic age label. Then consider how much the finished fabric stretches before committing to the final join. When a tutorial supplies its own sizing method, follow that construction-specific guidance rather than applying a universal percentage reduction.
Width also changes the feel. A broad band covers more of the forehead and ears, while a narrow band may interfere less with glasses, hair, or a hood. If blocking noticeably changes your chosen yarn, account for that before finalizing the fit.
Yarn, Texture, and Bulk Change the Finished Feel
Ear warmers sit directly against the forehead, temples, and ears, so yarn feel can matter as much as appearance. Smooth yarn generally makes cables, Alpine texture, chevrons, arrows, and bobble motifs easier to see. A very fuzzy or highly variegated yarn may soften those details visually.
Dimensional stitches also concentrate more yarn into the fabric. Puffs, bobbles, cables, and post-stitch textures can therefore feel more substantial than a flatter lemon-peel or simple ribbed band. That is not automatically better or worse; it depends on how you intend to wear the accessory.
Before committing to a strongly textured design, consider what will sit over it. A decorative raised front may look great when worn alone but feel bulky under fitted headwear or over-ear headphones.
Choose the Front Finish as Carefully as the Stitch
Twists, cinches, turban folds, flowers, and textured motifs all create a focal point at the front or side of an ear warmer. That detail can completely change the silhouette even when the underlying band is straightforward.
For a flatter profile, a continuous ring or understated seam keeps thickness distributed more evenly. Twist and turban designs gather multiple layers of fabric at the forehead, while a flower or bobble motif intentionally introduces a more decorative focal area.
Think about hair, glasses, hoods, and headphones before deciding. Also inspect where the final seam or join will rest. A visually neat finish is only useful if it remains comfortable against the head.
1. Crochet Classic Twist Ear Warmer
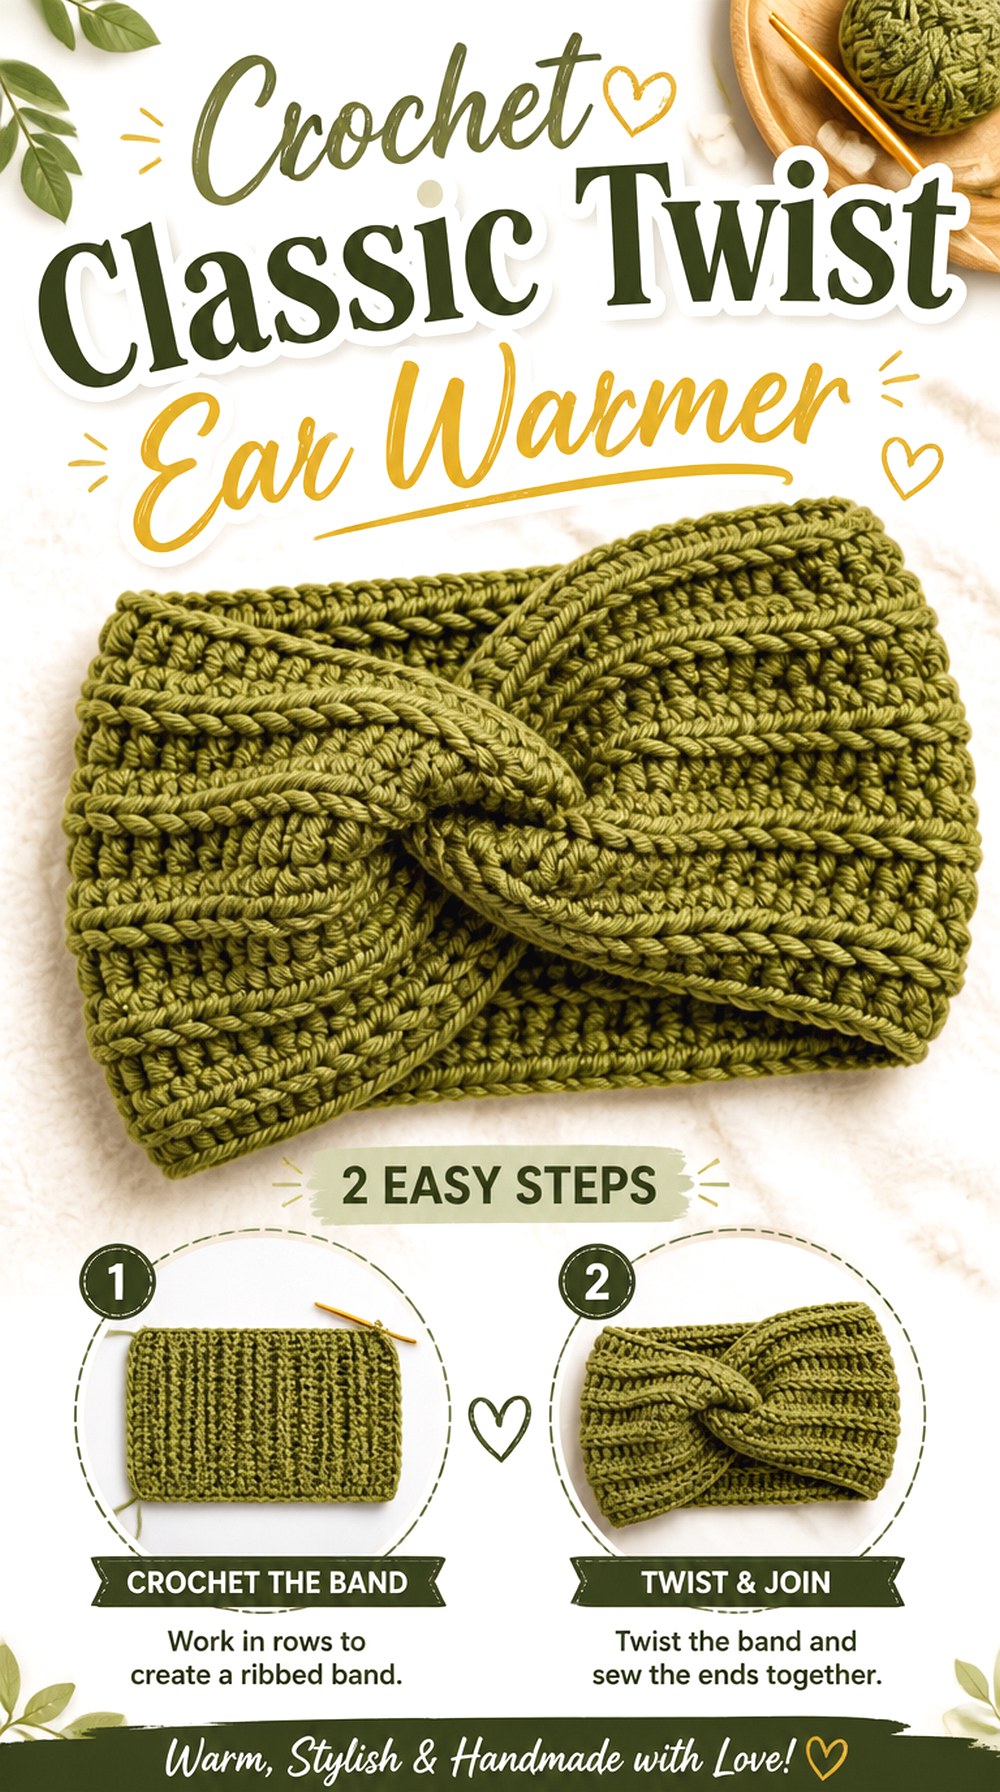
The Crochet Classic Twist Ear Warmer combines pronounced ribbing with a recognizable crossed front, giving a simple band a defined focal point without needing a separate decoration. The tutorial from Just Be Crafty demonstrates a ribbed band that is worked flat before the ends are arranged to form the twist.
This option works well for readers who like the clean lines of ribbing but want something more shaped than a plain ring. The twist also makes the front of the accessory visually distinct from the back, so orientation matters when putting it on or planning color changes.
The Front Twist Concentrates Fabric at the Forehead
A twist is not simply a decorative seam. It folds several layers of the band into one area, making the center front thicker than the sides. If you regularly wear a close-fitting hood or headphones, compare that extra thickness with a flatter ring-style option.
Before completing the join, position the unfinished band where you expect to wear it and consider whether the twist lands comfortably at the center of your forehead.
Ribbing Needs to Recover After It Stretches
Ribbed crochet is useful because its ridges can provide flexibility, but the amount of stretch depends on the yarn, hook, stitch formation, and individual tension. Avoid judging fit only from the relaxed length on a table.
Gently stretch the band as it would be worn and see whether it returns toward its original shape. Fabric that stays overly extended may produce a looser finished ear warmer than expected.
The Crochet Classic Twist Ear Warmer combines pronounced ribbing with a recognizable crossed front, giving a simple band a defined focal point without needing a separate decoration. The tutorial from Just Be Crafty demonstrates a ribbed band that is worked flat before the ends are arranged to form the twist.
This option works well for readers who like the clean lines of ribbing but want something more shaped than a plain ring. The twist also makes the front of the accessory visually distinct from the back, so orientation matters when putting it on or planning color changes.
The Front Twist Concentrates Fabric at the Forehead
A twist is not simply a decorative seam. It folds several layers of the band into one area, making the center front thicker than the sides. If you regularly wear a close-fitting hood or headphones, compare that extra thickness with a flatter ring-style option.
Before completing the join, position the unfinished band where you expect to wear it and consider whether the twist lands comfortably at the center of your forehead.
Ribbing Needs to Recover After It Stretches
Ribbed crochet is useful because its ridges can provide flexibility, but the amount of stretch depends on the yarn, hook, stitch formation, and individual tension. Avoid judging fit only from the relaxed length on a table.
Gently stretch the band as it would be worn and see whether it returns toward its original shape. Fabric that stays overly extended may produce a looser finished ear warmer than expected.
2. Crochet Tunisian Cinch Ear Warmer
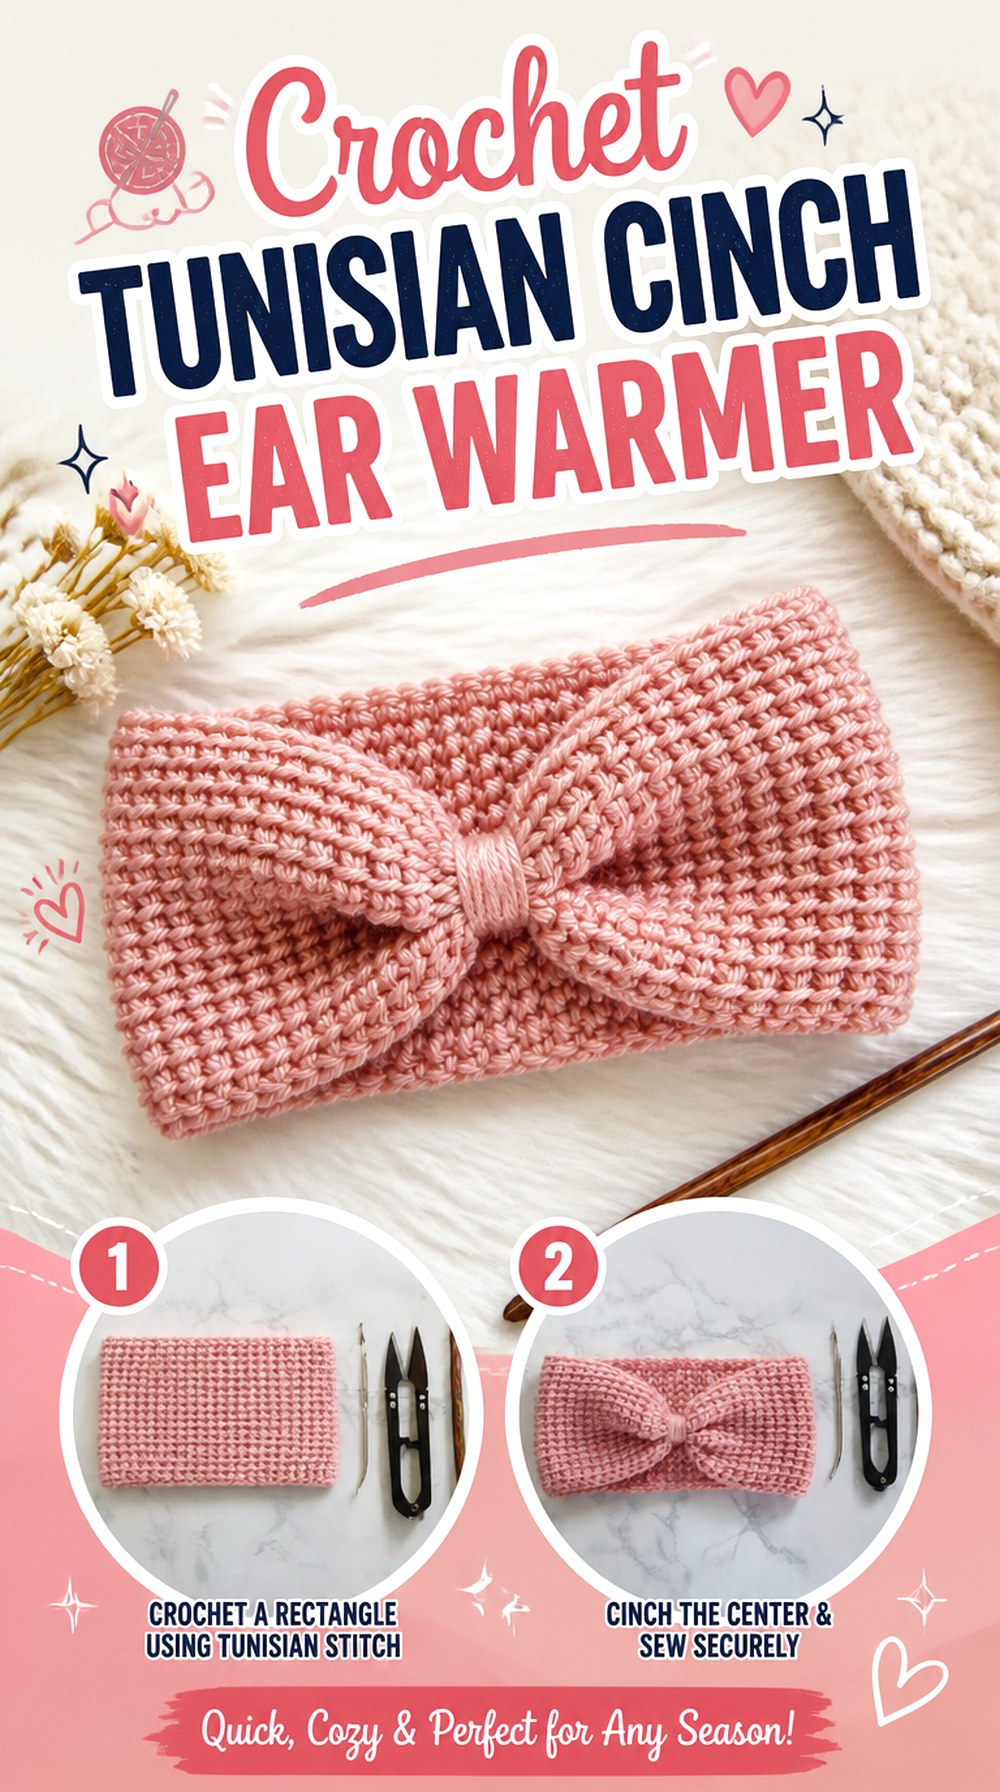
The Crochet Tunisian Cinch Ear Warmer offers a different learning route from standard crochet headbands. TL Yarn Crafts uses Tunisian crochet to create the main fabric and finishes the band with a gathered center detail rather than a large overlapping twist.
Its orderly surface gives the ear warmer a clean appearance, while the cinch prevents the front from looking completely flat. This is a useful project to compare with conventional ribbing if you want to explore Tunisian crochet on a manageable accessory rather than a large blanket or garment. Pay particular attention to the finished fabric’s flexibility because Tunisian fabric does not automatically stretch like ribbing.
Tunisian Fabric Deserves Its Own Stretch Check
Do not assume a Tunisian band will behave exactly like a visually similar piece of standard crochet. Stitch structure, yarn, tension, and hook choice all influence how much the fabric moves.
Check the actual band around the intended head position before final finishing when the construction permits it. The goal is enough negative ease to stay in place without turning the forehead edge into a tight pressure line.
The Cinch Gives Shape Without a Large Twist
Gathering the center creates a narrower focal point while leaving most of the band relatively smooth. Compared with a deep twist or turban fold, this can reduce the amount of overlapping fabric directly at the front.
When evaluating the finished piece, make sure the gathering looks centered when the back of the band is positioned where you actually intend to wear it.
Original Tutorial and Creator Credit
Creator: TL Yarn Crafts
3. Crochet Sculpted Cable Ear Warmer

For a more architectural surface, the Crochet Sculpted Cable Ear Warmer puts the texture itself at center stage. Kristina Crochet’s tutorial features a cable design that creates noticeable raised movement across the band instead of relying on a flower, knot, or contrasting color for interest.
This kind of ear warmer suits yarn that allows individual stitch columns to remain visible. It also offers a strong alternative to heavily ribbed designs because the surface pattern becomes the main design element. When choosing it, consider both visual definition and thickness: a cable can be impressive from the front while also creating more relief than a low-profile textured stitch.
Cable Relief Needs Clear Stitch Definition
A highly textured cable loses some of its visual impact when the yarn surface hides the boundaries between stitches. Smooth, clearly defined yarn lets light and shadow describe the raised structure more distinctly.
Before starting the full band, examine how your yarn looks in a small textured sample. If the relief almost disappears, decide whether you prefer the softer effect or would rather reserve that yarn for a simpler construction.
Watch the Width Around the Temples
Strong vertical or intertwined texture can make a band look substantial even before it is worn. Check not just overall circumference but also whether the chosen width sits comfortably between your hairline, ears, and glasses.
If you prefer a low-profile accessory under other winter layers, compare the cable design with the flatter lemon-peel or herringbone options later in this list.
Original Tutorial and Creator Credit
Creator: Kristina Crochet
4. Crochet Crunch Stitch Everyday Ear Warmer

The Crochet Crunch-Stitch Everyday Ear Warmer takes a quieter approach to texture. Sigoni Macaroni’s tutorial uses crunch stitch to create a patterned surface without the large raised elements found in bobble, puff, or cable designs.
That makes this a useful choice when you want the crochet texture to remain visible but do not necessarily want a dramatic centerpiece. The tutorial is presented as a resizable headband, which is especially relevant for anyone making the accessory for a different head measurement rather than reproducing one fixed sample. Its understated surface can also make yarn color the supporting feature instead of competing with an elaborate front treatment.
Crunch Texture Stays Visually Subtle
This surface has more character than completely smooth crochet but less sculptural depth than large puffs or cables. That distinction matters when you want an ear warmer that can coordinate with patterned coats, scarves, or hats without introducing another dominant motif.
For the clearest texture, look at your fabric in natural light before deciding whether your yarn is making the surface too busy.
Resize Through the Tutorial’s Fit Logic
Because the source specifically presents the headband as adaptable to different sizes, use its sizing guidance rather than copying a finished measurement from someone else’s project.
Whenever you resize an ear warmer, the useful checkpoint is the actual stretch and comfort of your fabric. Two crocheters can produce different elasticity even with the same nominal yarn category.
Original Tutorial and Creator Credit
Creator: Sigoni Macaroni
5. Crochet Double Puff Ribbed Ear Warmer

The Crochet Double-Puff Ribbed Ear Warmer is one of the more dimensional choices in this collection. LisaAuch Crochet’s tutorial combines prominent puff texture with ribbing, giving the finished band both repeated raised details and structured lines.
Compared with a flatter ear warmer, the surface has more visual depth and uses texture as decoration across the fabric rather than adding a separate motif. This is worth considering when you want a solid-colored yarn to produce plenty of interest on its own. Because puff stitches project outward, however, evaluate how much texture you want around the head—especially if the ear warmer will regularly be worn underneath another close-fitting layer.
Puff Texture Creates More Surface Bulk
Puff stitches gather multiple loops into raised units, so the resulting fabric can feel more substantial than a low-relief stitch. That can be desirable when the dimensional surface is the reason you chose the project.
It can also change how the band feels under a hood. If layering matters, compare the puff texture with a flatter sample before committing to the entire accessory.
Consistency Keeps the Raised Pattern Balanced
Repeated puffs make tension differences easy to notice because adjacent raised sections can appear different in size or fullness. Rather than rushing through the texture, periodically lay the band flat and compare the overall surface.
If one area is becoming noticeably tighter or looser, correcting your working tension earlier is easier than trying to disguise an uneven section after finishing.
Original Tutorial and Creator Credit
Creator: LisaAuch Crochet
6. Crochet Wide Cinch Ear Warmer
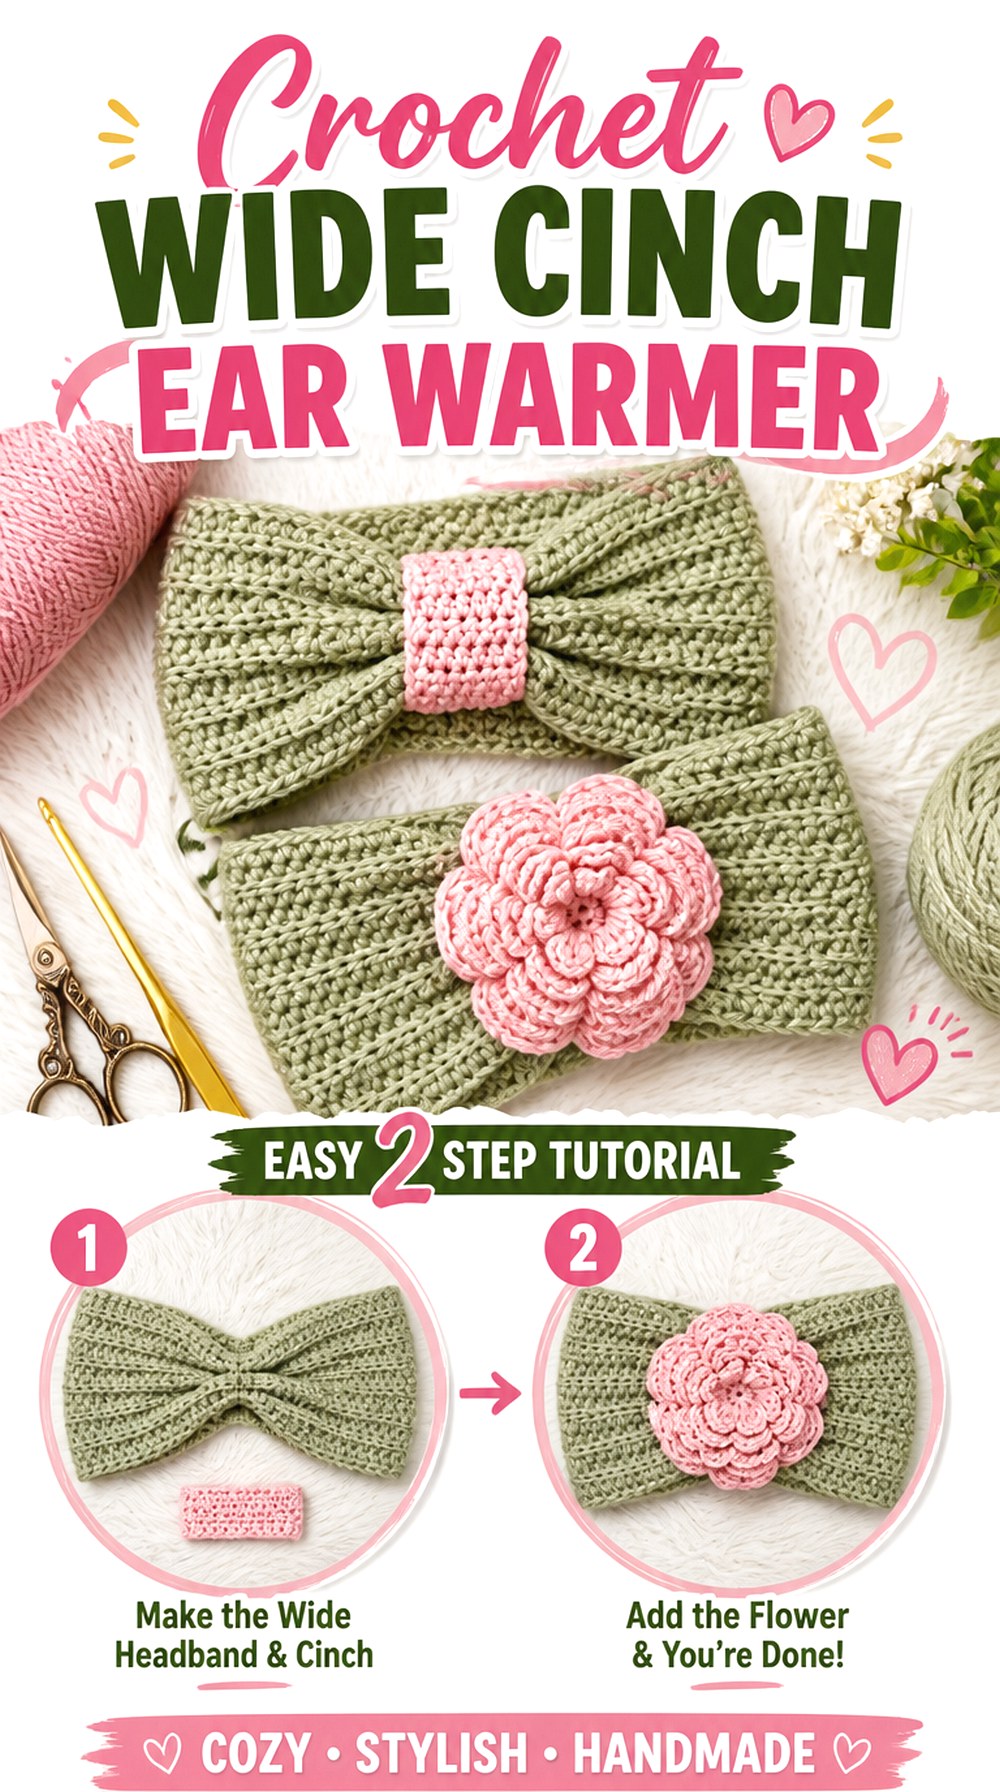
The Crochet Wide Cinch Ear Warmer emphasizes coverage. Hope Corner Farm Crochet’s version forms a broad headband and gathers the center, producing a noticeably different silhouette from narrow ribbed bands or thick twisted fronts.
A wider format may appeal when you want more of the ears and surrounding area covered, or when you simply like the appearance of a substantial band. The cinched center prevents all that width from reading as one uninterrupted rectangle across the forehead. Because more fabric sits against the head, this is a project where width, yarn feel, and final tension deserve just as much attention as circumference.
Extra Width Changes More Than Coverage
Increasing width means more fabric sits near the hairline and around the ears. Before finishing, check whether the upper and lower edges land comfortably for the intended wearer rather than assuming wider is automatically preferable.
Someone who wears glasses or tucks the band beneath a hood may prefer a different width from someone who plans to wear it as the main winter head accessory.
Keep the Gathered Center Comfortable
A cinch compresses a wide section of fabric into a relatively small focal area. The gather should shape the band without forming a hard lump where it touches the forehead.
After the center treatment is positioned, feel both the outside and inside of the warmer. Any finishing tails or joins on the inner face should be secured neatly so they do not become the most noticeable part when worn.
Original Tutorial and Creator Credit
Creator: Hope Corner Farm Crochet
7. Crochet Lemon Peel Ring Ear Warmer
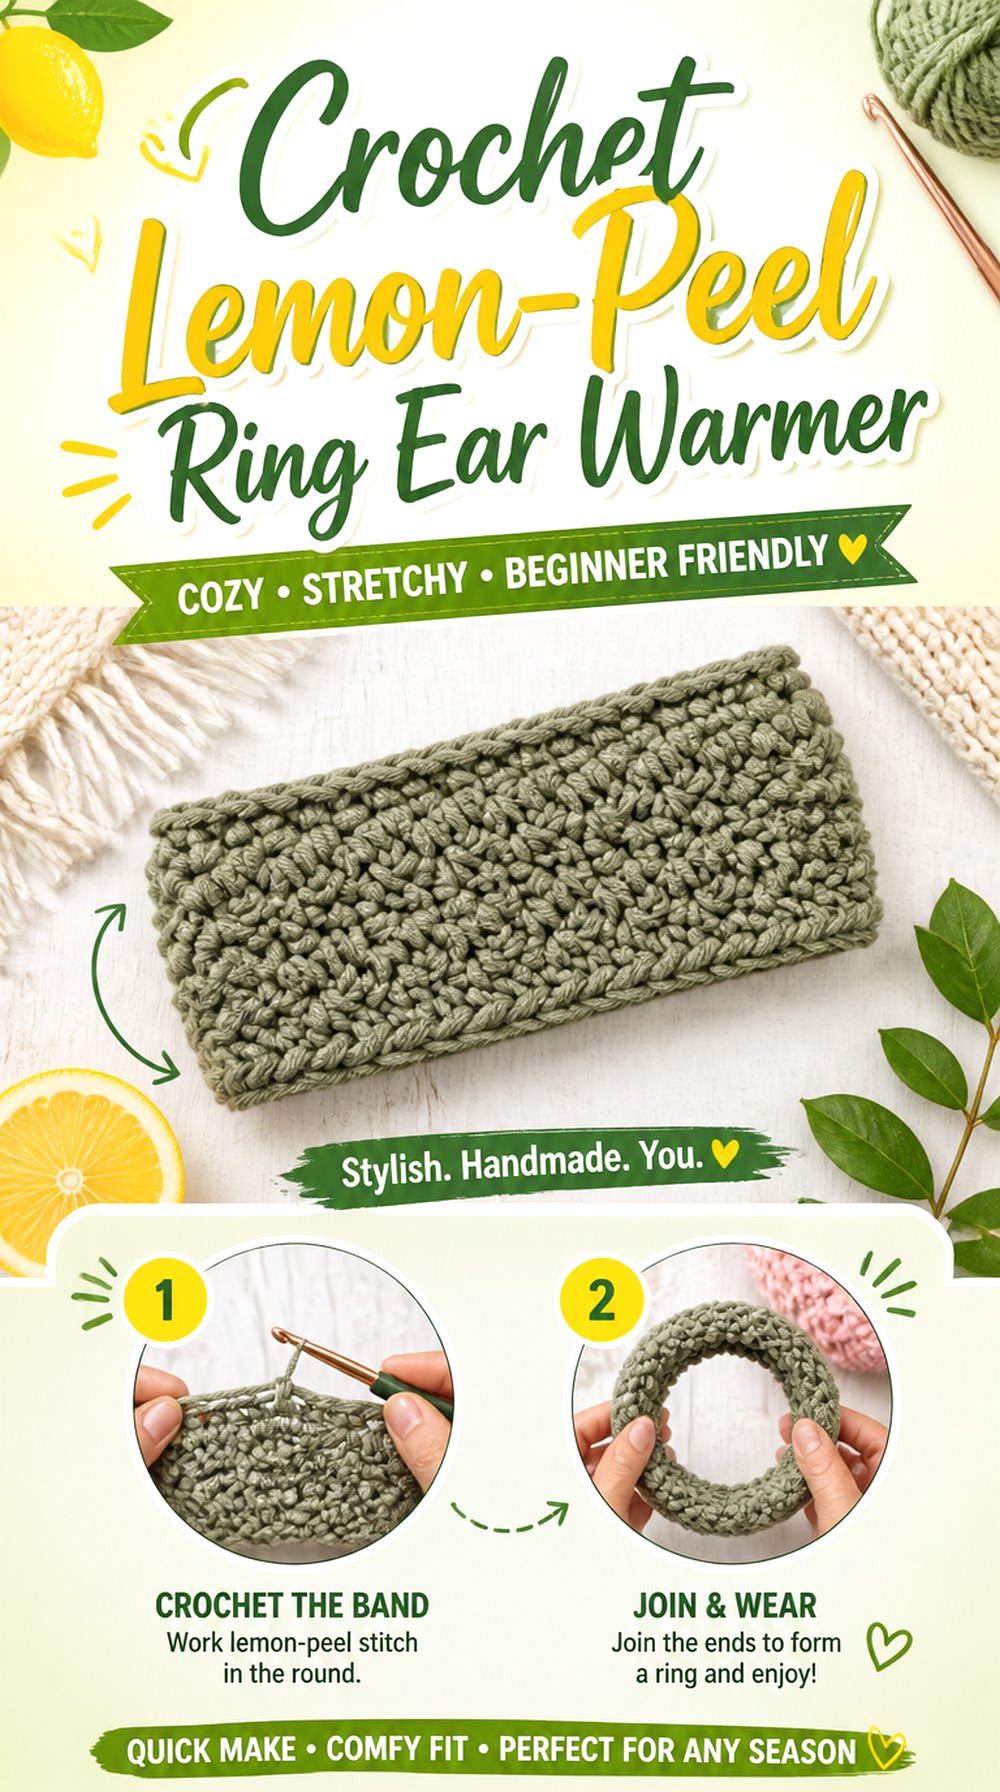
The Crochet Lemon-Peel Ring Ear Warmer is a good counterpoint to the collection’s twisted and cinched designs. A Crafty Concept uses lemon-peel stitch for the band, with the fabric worked in the round rather than building the whole look around an overlapping front knot.
The result keeps the texture distributed around the accessory, so no single decorative element has to carry the design. This can suit readers who prefer a more uniform silhouette or who want to highlight a softly textured stitch pattern. It is also a useful construction to compare with flat strips that require a decorative final seam.
A Ring Design Distributes the Visual Weight
Without a large twist or appliqué dominating the front, the lemon-peel texture can be appreciated around the whole band. This creates a quieter finish that may coordinate more easily with other strongly patterned accessories.
It also means tension consistency matters across the entire circumference. Look at the band from several angles instead of evaluating only whichever section you have designated as the front.
Texture Still Needs a Comfortable Inner Surface
Even relatively low-profile stitches can feel different depending on the yarn. Because an ear warmer remains in contact with sensitive areas around the forehead and ears, softness should be judged against skin rather than by handling the skein alone.
If your yarn feels scratchy in a swatch after several minutes of contact, a beautifully even texture may still be the wrong choice for this particular wearable.
Original Tutorial and Creator Credit
Creator: A Crafty Concept
8. Crochet Herringbone Texture Ear Warmer
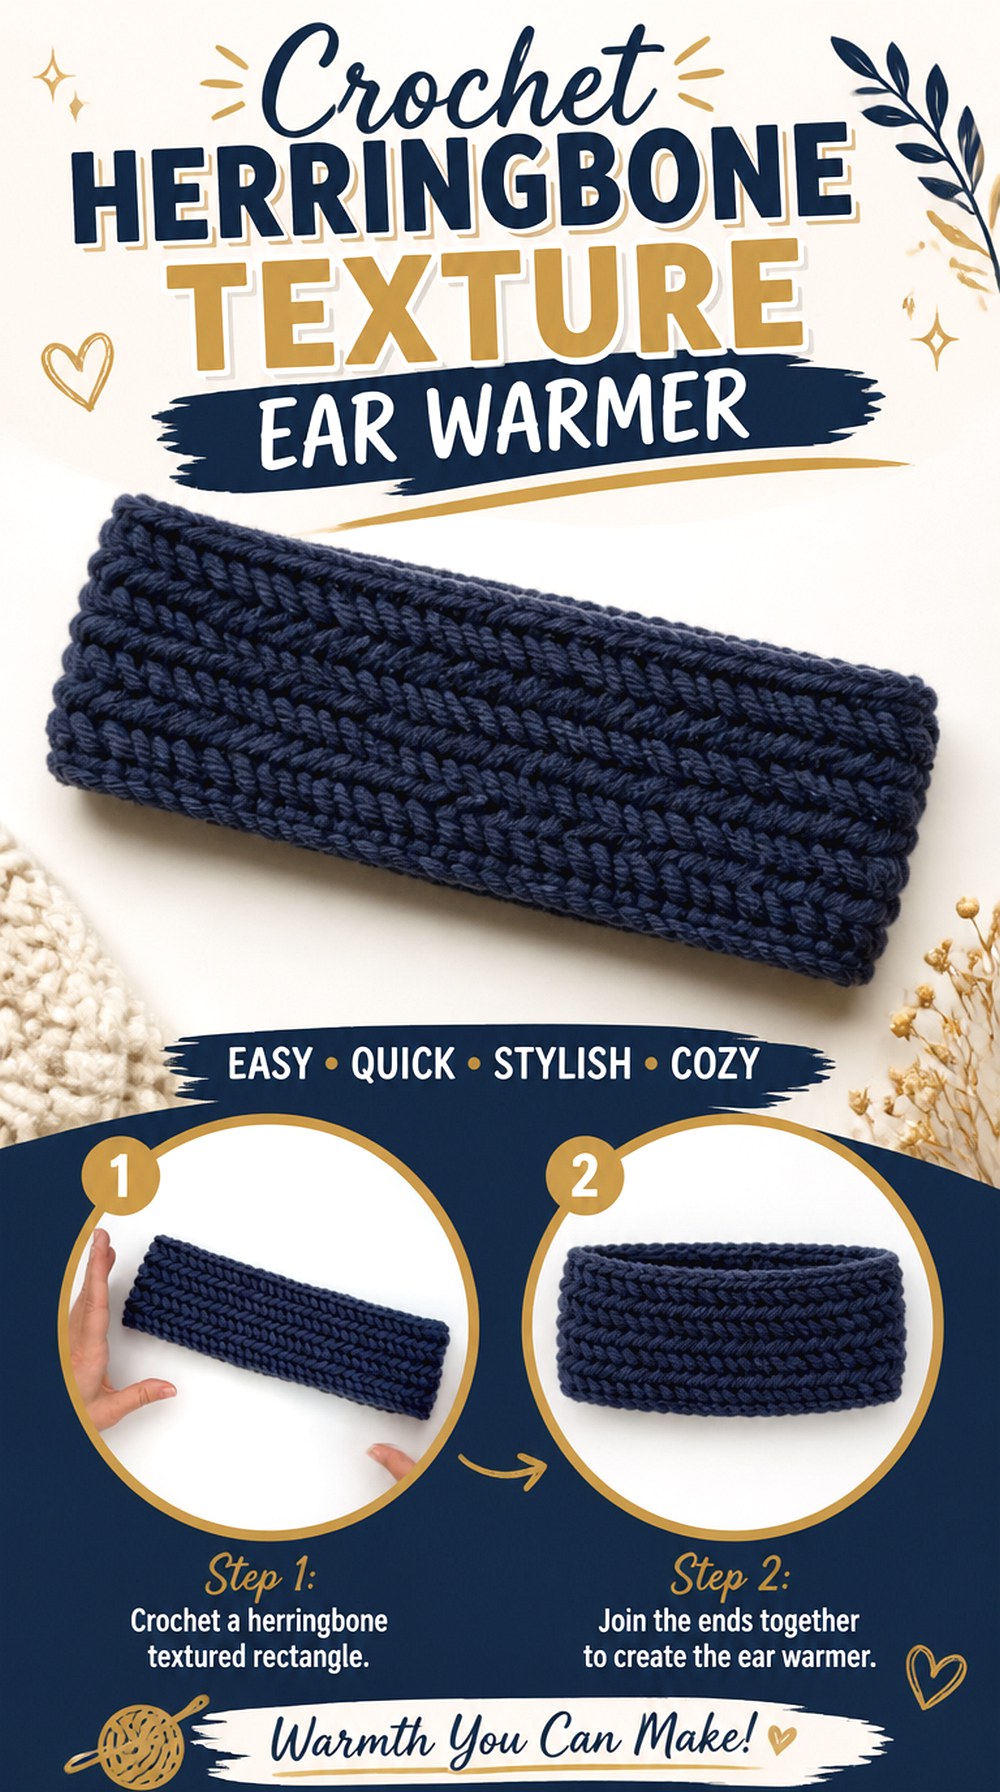
The Crochet Herringbone Texture Ear Warmer draws its identity from directional stitch texture rather than a large decorative front. Diving Ducks Crochet demonstrates a headband built around a herringbone surface, giving the fabric repeated lines that create movement while keeping the overall accessory recognizable as a straightforward band.
This option sits nicely between very plain crochet and highly sculpted cable or puff designs. It is worth considering when you want the stitch pattern to show clearly without adding an appliqué or gathered centerpiece. A single-color yarn can emphasize the directional texture, while a busier yarn may shift more attention toward color.
Directional Lines Make Tension Easier to See
Herringbone texture develops through repeated angled-looking stitch relationships, so inconsistent tension can interrupt the visual flow. Every so often, place the work on a flat surface and view it from farther away.
You are not looking for machine-perfect crochet. The useful checkpoint is whether the overall lines remain coherent enough that the intended texture is visible rather than broken into obviously tighter and looser areas.
Check the Edges Before Final Finishing
A beautifully textured center can still produce a disappointing headband if its long edges ripple or pull inward. Compare both edges as the band grows and watch for a noticeable difference in length or tension.
Addressing edge consistency during the project is particularly valuable on a simple silhouette because there is no large twist or embellishment to visually distract from an uneven outline.
Original Tutorial and Creator Credit
Creator: Diving Ducks Crochet
9. Crochet Alpine Panel Ear Warmer

The Crochet Alpine-Panel Ear Warmer places strong raised texture through the body of the headband. Bags by Bento’s tutorial centers on Alpine stitch, a texture associated with pronounced relief created by the relationship between regular stitches and raised post-stitch details. The finished ear warmer also contrasts that dimensional area with more restrained edging.
This design is useful when you want substantial texture without a separate flower, bow, or knot. Because the surface relief is the star, yarn choice can make a large visual difference. It also deserves a comfort check on the inside before you decide how tightly you want the band to fit.
The Raised Center Benefits From Crisp Definition
Alpine texture is much easier to appreciate when individual raised areas remain visible. A smooth yarn can emphasize the relief, while heavy halo or complex color changes may soften its appearance.
Neither choice is inherently wrong. Decide whether you want the project to showcase the stitch architecture or the yarn first, then choose the other component to support that priority.
Balance Texture Against the Edges
When a central texture is more dimensional than its surrounding sections, transitions matter. Look at whether the edges remain flat and whether the raised fabric is pulling them inward.
Before final finishing, lay the band relaxed on a surface. If the center bunches significantly while the edges spread, reconsider tension or blocking rather than assuming wear will automatically correct the imbalance.
Original Tutorial and Creator Credit
Creator: Bags by Bento
10. Crochet Ribbed Turban Ear Warmer

The Crochet Ribbed Turban Ear Warmer uses gathered shaping to create a stronger front profile than a basic ribbed ring. Nebeska Crochet with Love demonstrates a ribbed, knit-like ear warmer with a turban-style center treatment, making this option especially distinctive when viewed from the front.
This construction is worth comparing directly with the classic twist and wide cinch designs. All three manipulate the front fabric, but the turban treatment creates its own folded, gathered silhouette. It can work as a visual centerpiece with a simple yarn, though anyone who prioritizes a very flat fit under a hood may prefer one of the less layered designs.
The Turban Fold Creates a Stronger Front Profile
A turban finish intentionally brings fabric together at the forehead. That is part of its appeal, but it also creates more localized volume than a plain band.
Look at the finished tutorial sample from both front and side angles before choosing this design. If you often wear close-fitting outer layers, think about whether that center volume will remain comfortable once another item sits over it.
Let the Ribbing Participate in the Fit
The ribbed fabric is not merely decorative; its flexibility affects how the band settles around the head. Test the actual stretch of your fabric instead of choosing finished length solely by appearance.
The key checkpoint is recovery. After gently stretching the piece, it should still return enough to maintain a secure fit rather than remaining permanently elongated.
Original Tutorial and Creator Credit
Creator: Nebeska Crochet with Love
11. Crochet Diagonal C2C Ear Warmer
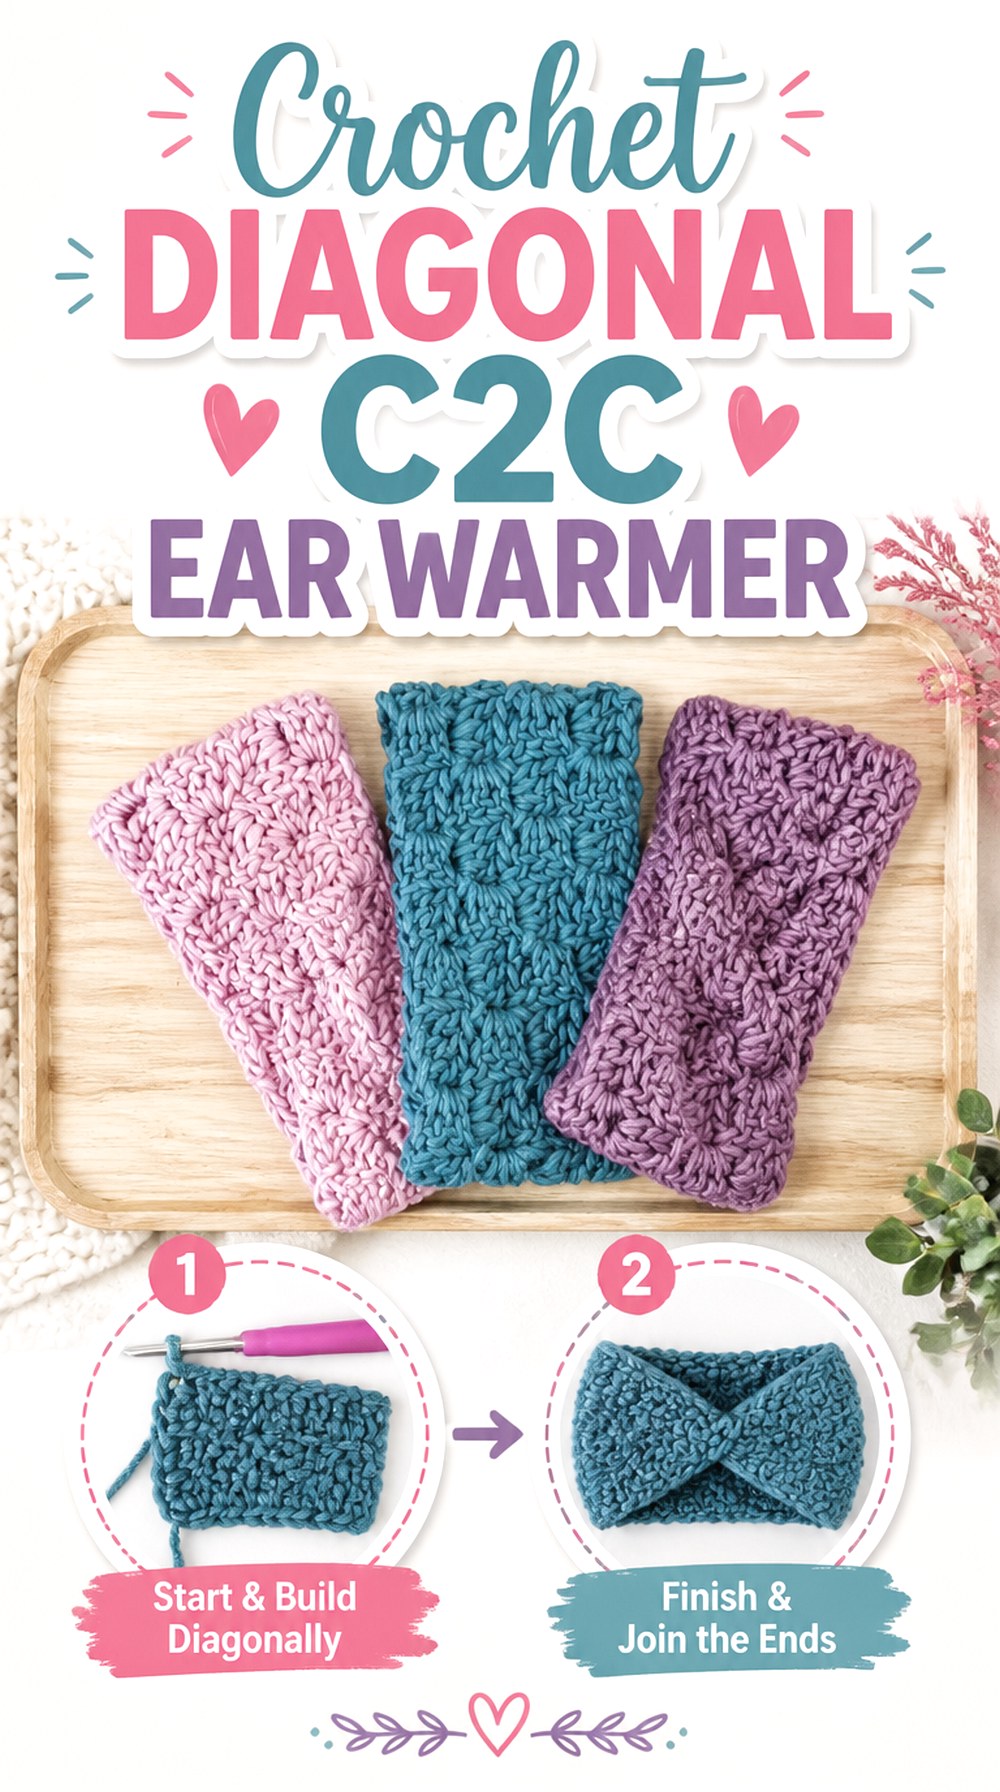
The Crochet Diagonal C2C Ear Warmer brings corner-to-corner construction into a much smaller wearable format. Fiber Flux’s Winter Landscape Ear Warmers use chunky C2C-style fabric and demonstrate multiple ways the finished band can be treated at the front, including different seam or gathered effects.
That makes this project unusually flexible from a styling perspective. The block-like diagonal surface already creates a noticeable visual rhythm, so you can decide whether the front treatment should remain restrained or become another feature. It is a useful option for crocheters who enjoy C2C construction but want something more compact than the blankets commonly associated with the technique.
Diagonal Blocks Make Color Placement Noticeable
C2C texture naturally creates visible block relationships, which can make deliberate color changes particularly prominent. Before using several shades, decide whether you want the eye to follow the stitch direction or focus on broader color sections.
If your yarn already changes color frequently, consider whether the resulting combination will highlight the C2C structure or make the block pattern harder to distinguish.
Choose the Front Treatment Before the Final Join
Fiber Flux presents more than one finishing look for these ear warmers, so the same core fabric can lead to noticeably different silhouettes.
Compare the alternatives before completing the band rather than treating the finish as an afterthought. A straightforward join keeps attention on the C2C surface, while a cinched or twisted treatment makes the center front another design element.
Original Tutorial and Creator Credit
Creator: Fiber Flux
12. Crochet Flower Accent Ear Warmer

The Crochet Flower-Accent Ear Warmer shifts the design emphasis from all-over stitch texture to a distinct decorative feature. Naztazia’s tutorial pairs an ear-warmer band with a crocheted flower, creating an asymmetrical accent that can sit toward one side rather than directly in the center.
This approach is useful when you want a recognizable decorative motif without covering the entire band in complicated texture. The band and flower can also be visually coordinated or contrasted depending on the effect you want. The main practical consideration is placement: the flower adds thickness at one localized point, so think about glasses, hair, hoods, and how the wearer naturally positions the band.
Side Placement Can Avoid the Center-Forehead Bulk
Moving the decorative focus away from the center changes both the appearance and the feel. Try positioning the flower location before securing the final embellishment so you can check how it interacts with the ear and temple.
For someone who wears glasses, avoid placing the thickest part directly where it will compete with the arms of the frames unless that position feels comfortable in practice.
Secure the Flower for the Intended Wearer
An attached motif should be connected firmly enough that normal handling does not leave it dangling from a small section of yarn. Spread secure attachment points where appropriate without flattening the flower so completely that it loses its shape.
If adapting this idea for a baby or small child, avoid adding loose beads, buttons, or other detachable small embellishments that could create a hazard.
Original Tutorial and Creator Credit
Creator: Naztazia
13. Crochet Heart Bobble Ear Warmer
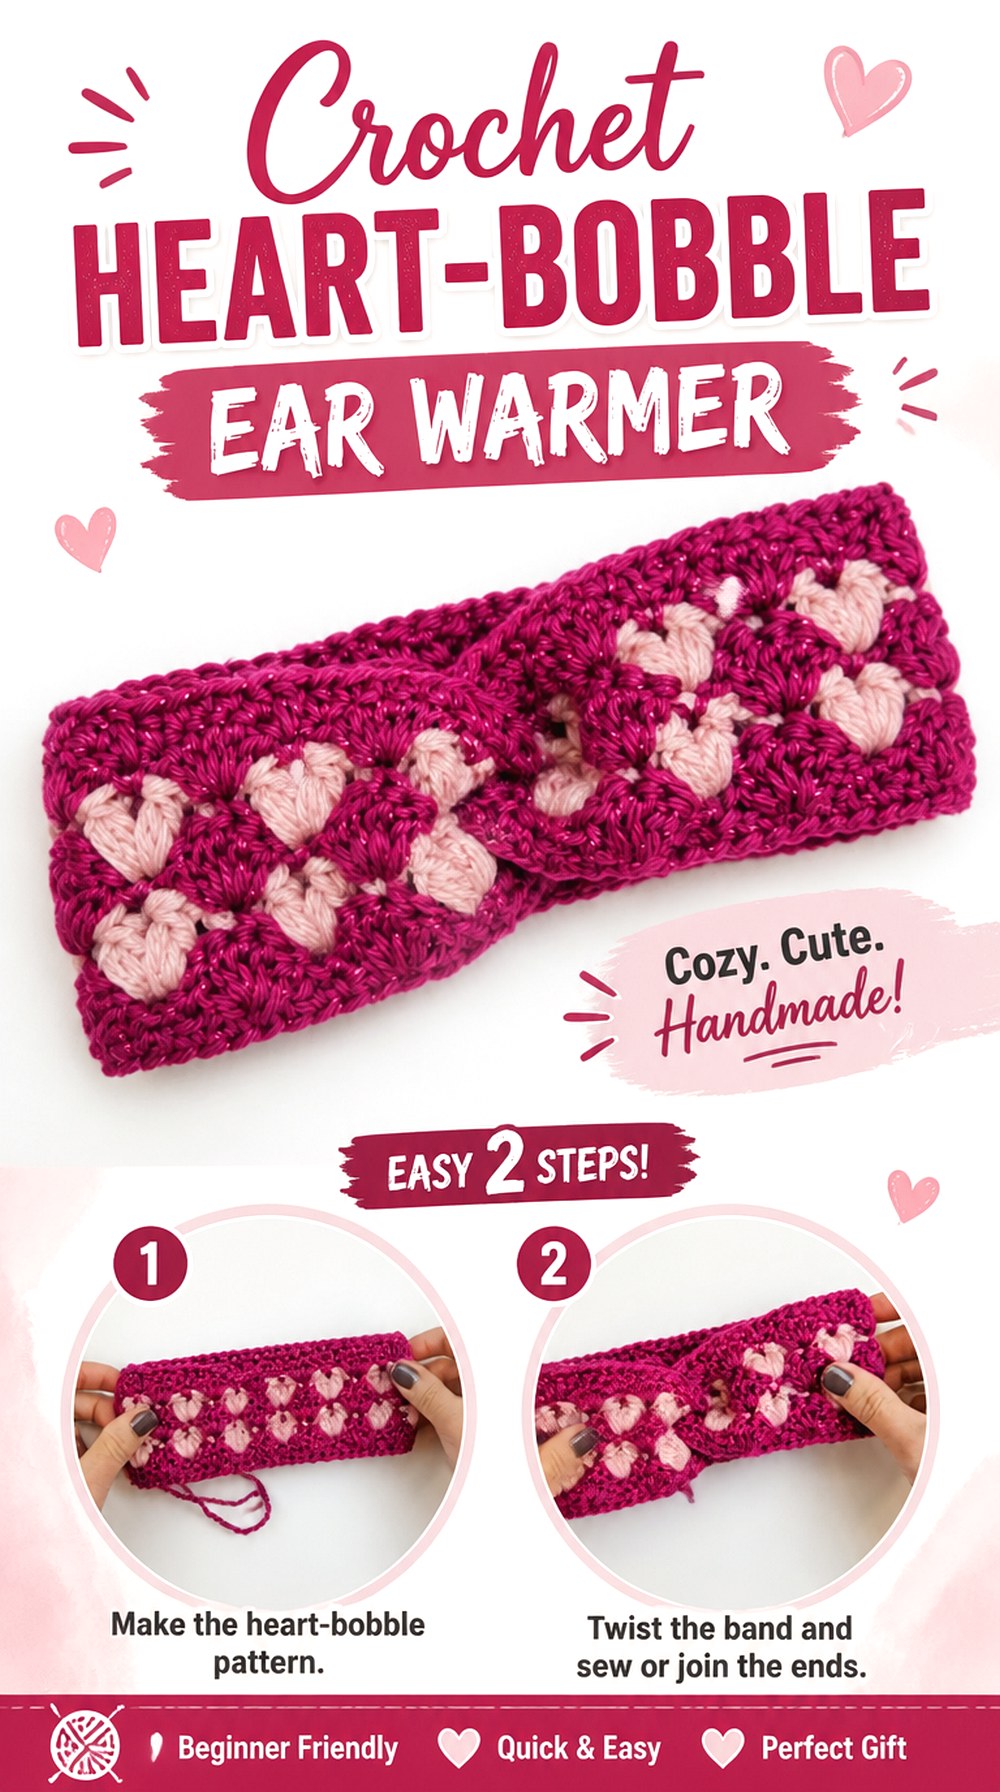
The Crochet Heart-Bobble Ear Warmer turns the surface of the band into a motif rather than attaching a separate decoration. Stitch and Hound Crochet’s Lovebug Bobble Earwarmer uses raised bobbles to form heart imagery across the headband, giving the project both texture and a recognizable graphic element.
This makes it different from the all-over puff design: the raised stitches here contribute to a planned motif rather than functioning only as repeated texture. It can suit seasonal gifting or anyone who likes graphic crochet details, but motif visibility depends on yarn choice, tension, and how clearly the bobbles stand away from their background.
Heart Motifs Need Enough Visual Separation
If the background and raised bobbles visually merge, the hearts may read mainly as general texture. A yarn with clear stitch definition helps the motif boundaries remain easier to recognize.
Before committing to a complex color effect, inspect the first visible motif from a normal viewing distance. The heart should still read when you are not looking at the crochet from only a few inches away.
Plan the Finish Around the Motif Repeat
A repeated motif can look balanced through most of a band but become awkward where the two ends meet. Before final joining, look at which part of the heart arrangement will be positioned near the seam.
The goal is not to alter the creator’s construction, but to understand where the tutorial intends the visual repeat to finish so the most noticeable design area remains deliberate.
Original Tutorial and Creator Credit
Creator: Stitch and Hound Crochet
14. Crochet Chevron Ridge Ear Warmer

The Crochet Chevron Ridge Ear Warmer introduces zigzag geometry to the collection. Crochet Bits’ tutorial creates a chevron-style headband, giving the band repeated directional changes instead of a straight rib, central twist, or isolated raised motif.
That geometry provides visual movement without needing a separate embellishment. The design is particularly worth considering if you enjoy stitch patterns where the overall outline of the repeat matters as much as individual stitches. Because chevrons depend on recognizable peaks and valleys, evenness across repeated sections becomes an important finishing checkpoint. A simple yarn can let the geometry dominate, while stronger color changes can compete with it.
Chevron Peaks Reveal Alignment Problems Quickly
Repeated peaks create reference points that make it easy to notice when one area starts leaning, widening, or becoming compressed relative to the rest of the band.
Periodically view several repeats together rather than inspecting only the active row. If the zigzag rhythm begins to look inconsistent, correcting your counting or tension early prevents a small discrepancy from becoming an obvious finishing issue.
Decide Whether Color or Geometry Should Lead
A chevron already supplies strong directional movement. Adding a yarn with rapid or dramatic color changes can create a second visual rhythm over the top.
If you want the ridge shape to be immediately readable, choose a yarn treatment that does not overpower it. If color is the priority, accept that the chevron may become a subtler background texture instead.
Original Tutorial and Creator Credit
Creator: Crochet Bits
15. Crochet Raised Arrow Ear Warmer

The Crochet Raised-Arrow Ear Warmer finishes the list with another graphic texture, but its character is quite different from the flat directional movement of a chevron. Kay Krochets’ Arrow Ear Warmer uses raised arrow-shaped details, with post-stitch texture helping the motif project from the surrounding fabric.
This design works particularly well when you want one-color crochet to look patterned without adding appliqués or frequent color changes. Because the arrow motif depends on relief, the relationship between yarn definition and stitch depth is central to the finished appearance. It is also worth checking the reverse surface before deciding how snugly you want to wear it.
Raised Arrows Need Enough Relief to Stay Legible
The arrow design is created through texture, so a yarn that visually blurs the raised areas can make the motif much more subtle. Look at the work from the distance at which someone would normally see the finished accessory.
If the arrows disappear unless you inspect them closely, decide whether that softer effect suits you or whether a clearer-definition yarn would better serve the design.
Inspect the Inside Before Prioritizing the Outside
With any heavily textured ear warmer, the attractive exterior is only half the project. Run your fingers along the surface that will touch the forehead and ears and check for uncomfortable ridges, joins, or unsecured ends.
This is especially worthwhile before final finishing because the accessory may look excellent laid flat while feeling quite different once slight wearing pressure is added.
Which Crochet Ear Warmer Style Should You Choose?
| Ear Warmer | Main Visual Feature | Useful Check Before Choosing |
|---|---|---|
| Classic Twist | Ribbing with crossed front | Comfort of layered front |
| Tunisian Cinch | Tunisian fabric with gathered center | Stretch of finished fabric |
| Sculpted Cable | Strong raised cable | Yarn stitch definition |
| Crunch-Stitch | Low-profile all-over texture | Fit and tension consistency |
| Double-Puff Ribbed | Dimensional puff surface | Bulk beneath other layers |
| Wide Cinch | Broad coverage with gathered front | Comfortable finished width |
| Lemon-Peel Ring | Even texture around band | Yarn softness against skin |
| Herringbone | Directional surface texture | Straight, balanced edges |
| Alpine-Panel | Pronounced raised center | Definition and fabric balance |
| Ribbed Turban | Gathered folded front | Front volume and ribbing recovery |
| Diagonal C2C | Block-like diagonal texture | Front finish and color layout |
| Flower-Accent | Separate floral focal point | Placement near temple or glasses |
| Heart-Bobble | Raised graphic heart motifs | Motif clarity and seam position |
| Chevron Ridge | Repeated zigzag geometry | Peak and valley consistency |
| Raised-Arrow | Sculpted arrow relief | Outside definition and inner comfort |
Conclusion
Choose your crochet ear warmer by construction first and decoration second. For a cleaner, lower-profile look, the lemon-peel, crunch-stitch, or herringbone bands keep their interest in the fabric itself. The cable, Alpine, puff, chevron, and raised-arrow options make texture much more prominent. Twist, turban, cinched, flower, and heart-bobble versions create a clearer focal point, while the Tunisian and C2C ideas offer a chance to explore a different crochet technique on a relatively compact wearable.
Whichever style fits your needs, check the actual stretch, inside comfort, width, and front bulk before finishing. Use the original tutorials linked above for each creator’s exact construction details.
Frequently Asked Questions
How tight should a crochet ear warmer fit?
It should stay in its intended position without creating uncomfortable pressure around the forehead or ears. There is no single amount of negative ease that works for every crochet ear warmer because stretch changes with yarn, stitch pattern, gauge, width, and construction. Measure the intended wearer and test the actual fabric whenever possible. A ribbed band may behave very differently from a cable, bobble, or Tunisian version of a similar resting length.
Which yarn is better when I want the ear-warmer texture to stand out?
A yarn with clear stitch definition generally makes cables, Alpine texture, arrows, bobbles, and chevrons easier to see. Heavy fuzz, novelty texture, or rapid color changes can visually soften those details. That does not make those yarns unusable; it simply shifts attention from stitch architecture toward the yarn itself. For any ear warmer, also consider how the fiber feels against the forehead and ears rather than choosing only for visual definition.
Are twist-front crochet ear warmers bulkier than plain bands?
They can be bulkier specifically at the front because the twist overlaps or folds several layers of fabric into a smaller area. A plain ring distributes its thickness more evenly around the head. The difference may matter if you wear the ear warmer under a close hood, helmet-compatible outer layer, or over-ear headphones. Compare the finished front profile of the tutorial with the way you intend to wear the accessory before choosing between the two constructions.
How can I resize a crochet ear warmer from a YouTube tutorial?
Use the tutorial’s own sizing guidance when it provides one, especially when the construction depends on repeats or a particular joining method. Start with the wearer’s head measurement, but also account for how your actual crochet fabric stretches. Avoid assuming that another project’s finished measurement will transfer directly. Yarn substitution, hook choice, stitch pattern, and individual tension can all change elasticity even when the project looks similar.
Should a crochet ear warmer be blocked before it is joined?
That depends on the yarn and construction, but blocking can be useful when it changes the dimensions, texture, or edge behavior of the fabric. For a design where final fit depends strongly on a flat strip’s length, it makes sense to understand how the yarn responds before making an irreversible join. Follow the creator’s finishing instructions and the care guidance for your specific yarn rather than applying heat, steam, or aggressive blocking automatically.
Which crochet ear warmers may work better with glasses, hoods, or headphones?
Lower-profile designs such as simple textured rings or bands usually introduce less localized bulk than large twists, turban folds, flowers, or strongly gathered centers. That does not mean decorative versions cannot work; placement matters. Check where your glasses arms, hood seams, or headphone pads normally sit, then compare those areas with the ear warmer’s thickest points. Comfort is individual, so trying the unfinished band in the intended position is more useful than relying on appearance alone.


