

Crochet skull projects can look completely different depending on how the skull is built. A skull might appear as a flat appliqué, an openwork image, a stuffed amigurumi, a colorwork panel, a granny square, or a repeating motif worked directly into a larger piece. That variety makes the theme useful for far more than Halloween decorations.
The 20 ideas below cover small accessories, garments, headwear, bags, home decor, and display pieces. More importantly, they give you different construction routes to compare. You can look at motif size, contrast, drape, fit, joining, lining, and finishing before committing to a project. Each idea also points to the original creator’s tutorial for the exact construction details rather than trying to replace their instructions here.
Quick List
- Crochet Graphic Skull Granny Square
- Crochet One-Piece Skull Appliqué
- Crochet Skull Face Coaster
- Crochet Dangling Skull Earrings
- Crochet Stuffed Skull Amigurumi
- Crochet Skull Balaclava
- Crochet Openwork Skull Bandana
- Crochet Narrow Repeating Skull Scarf
- Crochet Skull Triangle Shawl
- Crochet Allover Skull Blanket
- Crochet Skull Granny Square Pants
- Crochet Skull-and-Spider Garland
- Crochet Colorwork Skull Beanie
- Crochet Lace Skull Doily
- Crochet Tapestry Skull Fingerless Gloves
- Crochet Skull Granny Square Shoulder Bag
- Crochet Skull Patchwork Cardigan
- Crochet Decorative Sugar Skull
- Crochet Skull Face Mask
- Crochet Filet Skull Tote
Choose the Skull Construction Before Choosing the Colors
Skull crochet is easier to compare when you first decide how you want the image to appear. Granny-square projects isolate each skull inside a reusable block, which works well when you want to plan a bag, blanket, pants, or cardigan from repeated units. Filet and lace projects form the skull through open and solid spaces, so the background behind the crochet becomes part of the visual effect.
Tapestry and other colorwork approaches create a more solid surface and are useful when the skull needs to read clearly on a wearable. Appliqués are different again: the skull is made separately and attached to another object. Amigurumi turns the idea into a three-dimensional form.
Choosing the construction first prevents a common planning problem—finding a skull you like visually and only later realizing that its scale, density, or assembly style does not suit the finished item you wanted.
Contrast and Scale Determine How Clearly the Skull Reads
A skull motif usually depends on recognizable eye sockets, a nose area, a jaw or tooth line, or strong negative space. If those features disappear into the surrounding fabric, the design can stop reading as a skull even when the crochet itself is accurate.
High contrast is useful for graphic colorwork and granny squares, but contrast does not always require black and white. What matters is whether the skull and background remain visibly distinct. Lace and filet skulls work differently because skin, clothing, a lining, a table surface, or another background may show through the openings.
Scale also changes the effect. A small skull can become an earring or appliqué, while a larger repeat may suit a blanket or garment panel. Before repeating a motif, make one sample, finish or block it as appropriate, and judge the actual dimensions rather than planning from an unblocked piece.
Plan Fit, Structure, and Finishing Around the Finished Use
A skull can be decorative without carrying much structural responsibility, but a bag strap, cardigan shoulder, pair of pants, glove, or face covering has additional demands. Wearables need enough movement and appropriate fit. Bags need an opening and handles that make sense for what they will carry. Joined motifs should be consistent enough that seams do not have to correct large differences between blocks.
For face coverings, visibility and breathing room matter more than making the skull artwork perfectly symmetrical. For amigurumi, dense fabric helps prevent stuffing from showing through. For openwork bags, lining may be worth considering when small belongings could push through the fabric.
Treat these functional details as part of project selection. A beautiful skull motif does not automatically make every possible finished object practical.
1. Crochet Graphic Skull Granny Square
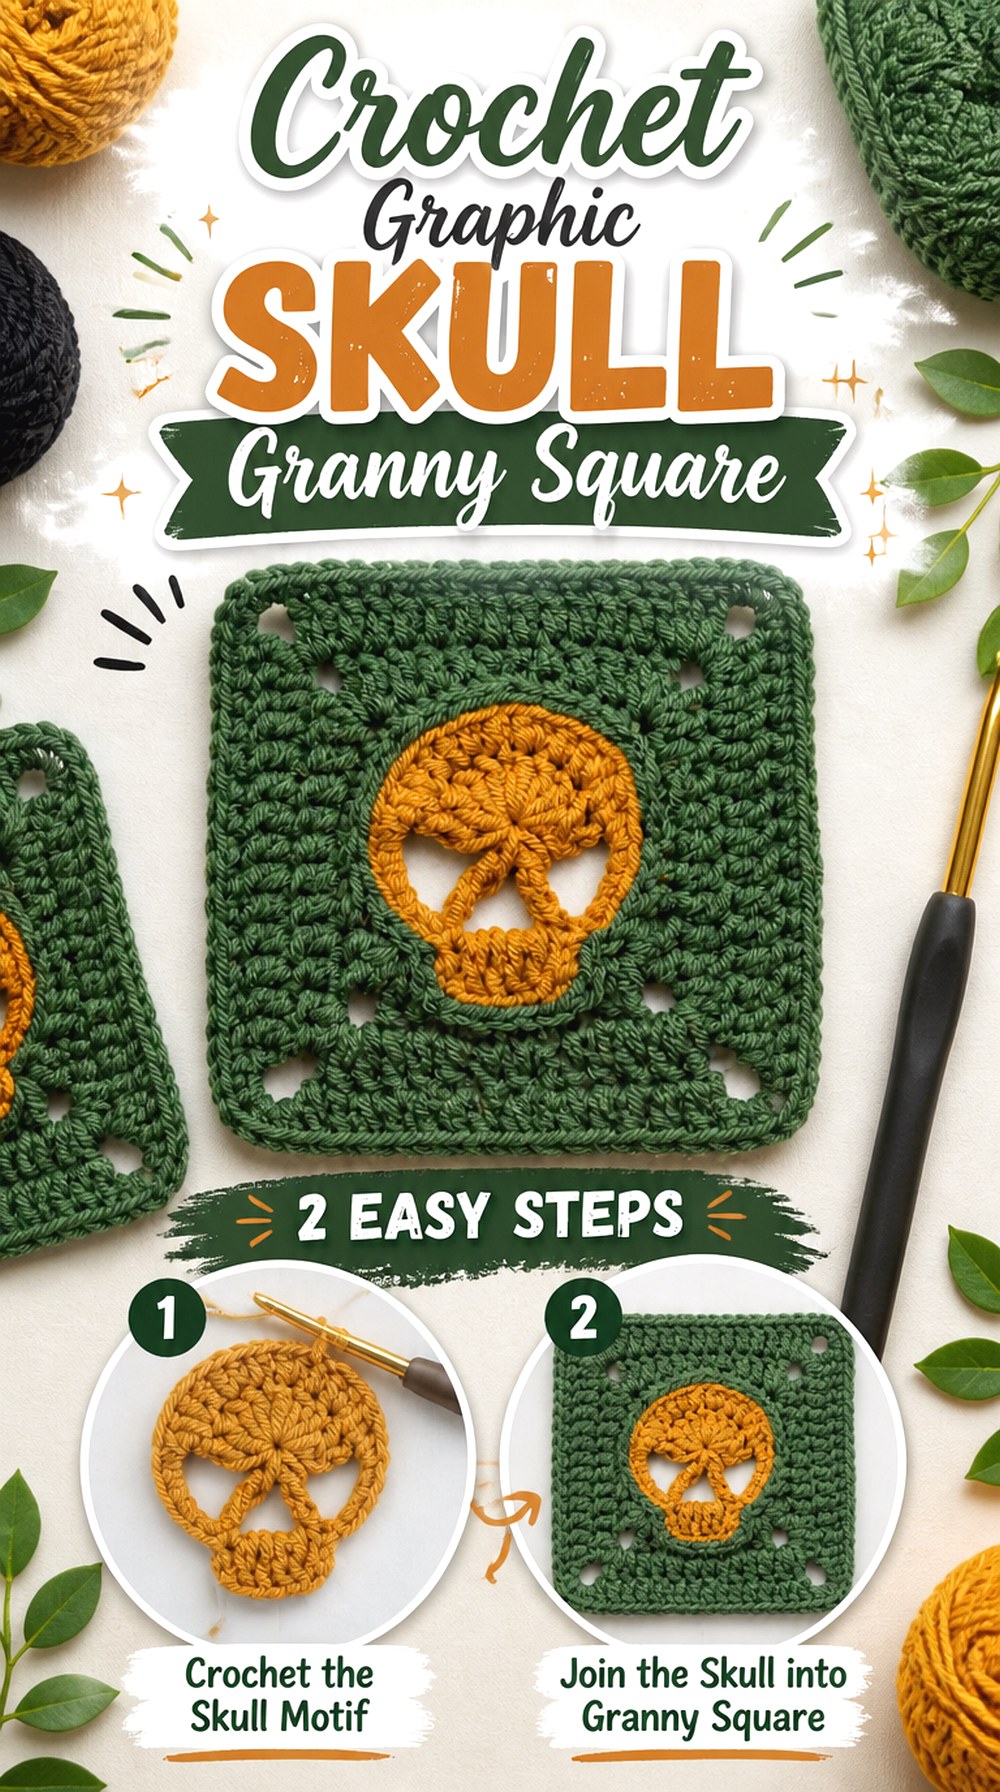
A skull granny square is one of the most adaptable projects in this collection because it separates the design into a clean modular unit. HiruHandmade Crochet’s tutorial produces a recognizable skull surrounded by a square border, giving you a motif that can remain a standalone decoration or become part of a larger layout.
The main advantage is flexibility after the first square is finished. You can evaluate its scale and visual density before deciding whether several motifs belong in a bag, garment, cushion, or blanket. That makes this a more useful starting point than committing immediately to a large skull project whose finished proportions are harder to change.
Block the Motif Before Building Around It
If several skull squares will eventually meet, compare their finished dimensions after the fabric has been prepared the same way. Small differences can become much more obvious when rows of motifs are joined.
Blocking can also reveal whether the skull stays centered once the outer square is shaped. If one motif is noticeably larger or more distorted, correct that issue before producing a large stack of matching squares.
Contrast Controls the Skull Silhouette
The surrounding square and the skull do not have to use traditional Halloween colors, but they do need enough visual separation for the face to remain readable.
Test your combination by viewing the finished square from farther away. If the eye and jaw areas merge into the background, a stronger contrast may communicate the motif better than adding more decorative colors.
Use the Square Where Seams Make Sense
A modular square works naturally in projects already designed around joined panels. Bags, blankets, patchwork garments, and cushions are easier adaptation targets than objects that depend on a smooth continuous surface.
Before substituting this skull square into another square-based project, compare the blocked dimensions and edge structure of both motifs. Matching the overall size is more important than assuming every granny square is interchangeable.
2. Crochet One Piece Skull Appliqué

A flat skull appliqué is useful when you want the theme without rebuilding an entire object around skull construction. Tangle with Yarn demonstrates a skull appliqué made as one connected crochet piece, creating a compact motif that can be positioned after the main project is already finished.
That opens up different possibilities from a granny square. Instead of repeating skull blocks across a surface, one appliqué can become a focal point on a bag, patch, banner, jacket, or piece of seasonal decor. Its smaller scale also makes it practical for experimenting with color and placement before committing to a more heavily themed project.
Flat Construction Makes Placement Flexible
An appliqué can be moved around before it is permanently attached. Use that flexibility to test the motif near a corner, centered on a panel, or grouped with other decorations.
The background affects readability too. Place the skull on the intended fabric before fastening it down and check whether the eye and jaw details still stand out against that particular stitch texture and color.
Secure the Edges for the Base Fabric
The attachment method should suit what the finished object will do. A decoration that stays flat on a wall has different demands from an appliqué attached to a frequently worn garment or handled bag.
Before fastening, make sure the skull is sitting flat rather than being stretched into shape by the sewing. The attachment should hold the motif in position without noticeably puckering the base fabric.
Original Tutorial and Creator Credit
Creator: Tangle with Yarn
3. Crochet Skull Face Coaster
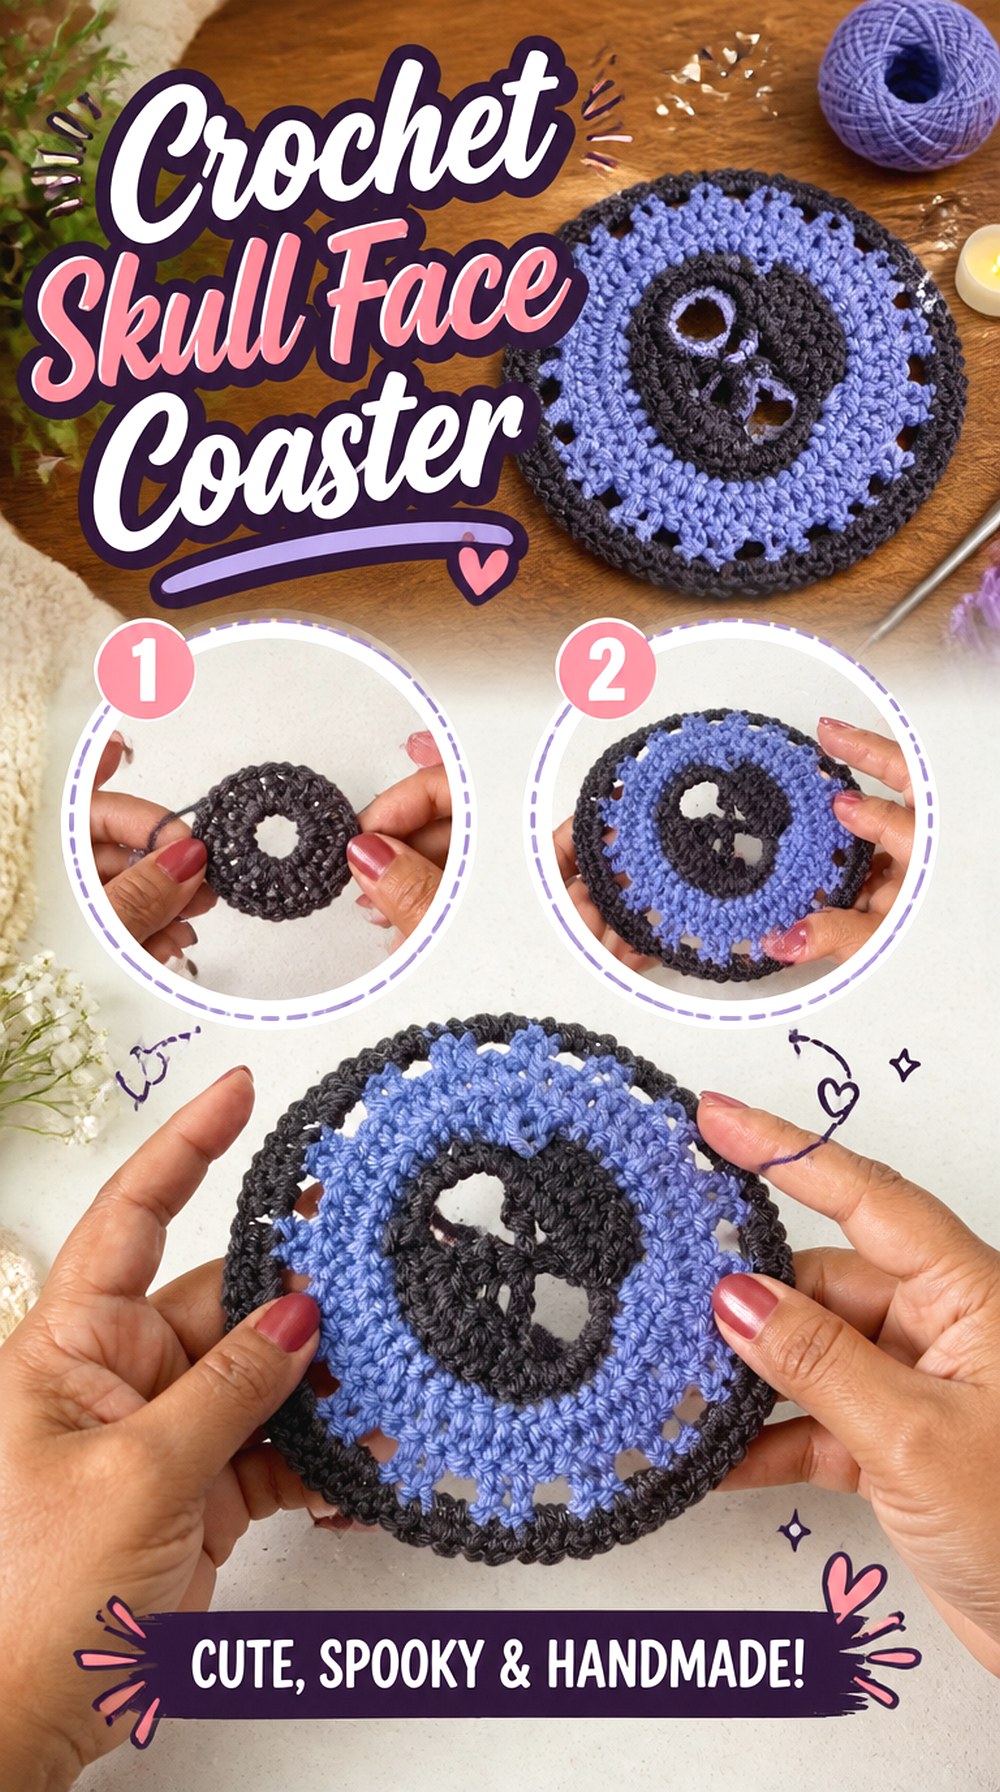
A skull coaster turns the motif into a small functional surface rather than a wearable or hanging decoration. Crochet Mili’s tutorial keeps the skull itself as the finished shape, so the outline and facial openings supply most of the visual interest without needing a larger square around them.
This is a useful option if you want something more substantial than an appliqué but far smaller than a placemat or doily. Because a coaster lies directly on a table, flatness matters as much as the skull detail. A dramatic outline is less useful if the finished piece curls, rocks, or develops raised areas that make a cup sit unevenly.
A Coaster Needs a Flat, Stable Finish
Judge the piece on a table before considering it complete. If the perimeter waves or the center cups upward, the final finish may need attention before the coaster is put into regular use.
Do not force the skull flat by heavily stretching only one section. Aim for an even shape so the decorative eye and jaw openings do not become distorted while the surface is being flattened.
Match the Fiber to Real Table Use
A coaster can encounter moisture and repeated cleaning, so fiber care deserves more attention here than it would on a purely decorative skull.
Check the yarn label for washing instructions and intended care. Do not assume that a yarn is heat resistant simply because it is commonly used for household crochet; if hot vessels are involved, verify the fiber’s appropriate use separately.
Original Tutorial and Creator Credit
Creator: Crochet Mili
4. Crochet Dangling Skull Earrings

Crochet skull earrings reduce the idea to wearable jewelry scale. CrochetCAT’s tutorial shows how a small skull can become a hanging pair instead of another large Halloween accessory. At this size, clean negative spaces and an upright hanging position matter more than adding a lot of surface detail.
This project is especially different from the appliqué and coaster because the crochet has to look balanced while suspended. The two pieces also need to appear reasonably consistent as a pair. If you like skull motifs but do not want a strongly themed garment, earrings provide a much smaller styling accent that can be worn with otherwise simple clothing.
Keep the Pair Visually Balanced
Make the second skull with the first one nearby rather than relying on memory. Compare the overall outline, eye openings, and finished hang before adding the jewelry findings.
Crochet tension can vary even within the same session, and small differences show more clearly when two motifs sit beside the face. Blocking or gentle shaping should be handled consistently on both pieces.
Let the Skull Hang Upright
Where the earring hardware attaches affects how the motif faces forward. Before making the final connection, temporarily hold or clip the skull from the proposed attachment point.
If it twists dramatically or hangs at an unintended angle, adjust the connection rather than trying to compensate by stretching the crochet. Comfort also matters, so choose findings and finished materials appropriate for the wearer.
Original Tutorial and Creator Credit
Creator: CrochetCAT
5. Crochet Stuffed Skull Amigurumi
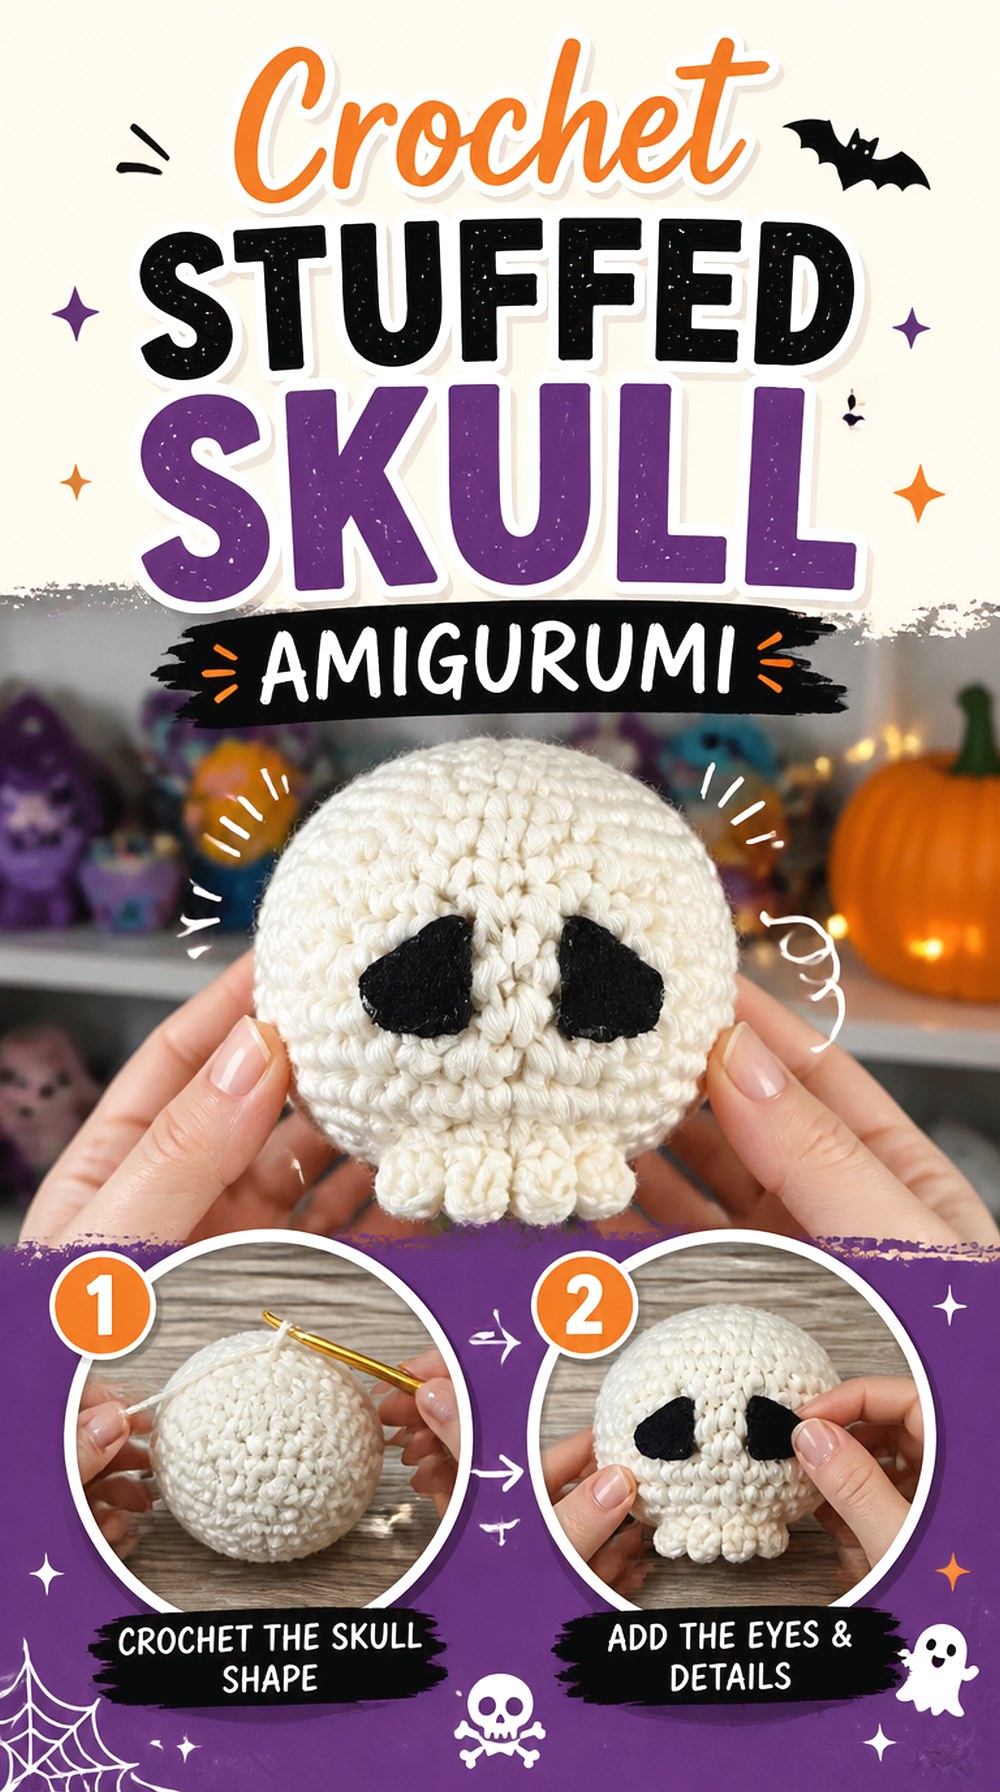
ComplicatedKnots takes the skull into three dimensions with a compact amigurumi form. Instead of relying on a background color to reveal an image, this project creates the skull through shaping, stuffing, and facial definition. The result can stand alone as a small decoration, and the creator also presents it as suitable for keychain use.
This is a useful choice if you prefer sculptural crochet over flat motifs. It also allows more character variation: changes in embroidery placement, stuffing distribution, and color can make the same basic skull feel cartoon-like, gothic, or playful without changing its basic identity.
Dense Fabric Helps Hide the Stuffing
Amigurumi generally benefits from fabric dense enough that filling does not show prominently through the stitches. Check the surface as the shape develops instead of waiting until the skull is fully stuffed.
If gaps are obvious, changing hook or tension choices early is easier than trying to disguise them after finishing. Use the material guidance from the original tutorial as the primary construction reference.
Facial Placement Changes the Character Quickly
Small changes around the eyes, nose, and mouth can make a compact skull look noticeably different. Before permanently securing embroidered or attached details, view the face straight on and from a normal viewing distance.
Symmetry can be useful, but a handmade skull does not need to look mechanically identical on both sides. Prioritize a clear expression and recognizable facial structure.
Decide on Display or Keychain Use Before Finishing
A shelf decoration does not experience the repeated pulling and movement of an object attached to keys or a bag. If you intend to turn the skull into a hanging accessory, pay particular attention to the attachment point and any small embellishments.
For items intended around young children or pets, avoid assuming decorative parts are safe simply because they are securely attached; suitability depends on the materials and intended supervision.
Original Tutorial and Creator Credit
Creator: ComplicatedKnots
6. Crochet Skull Balaclava
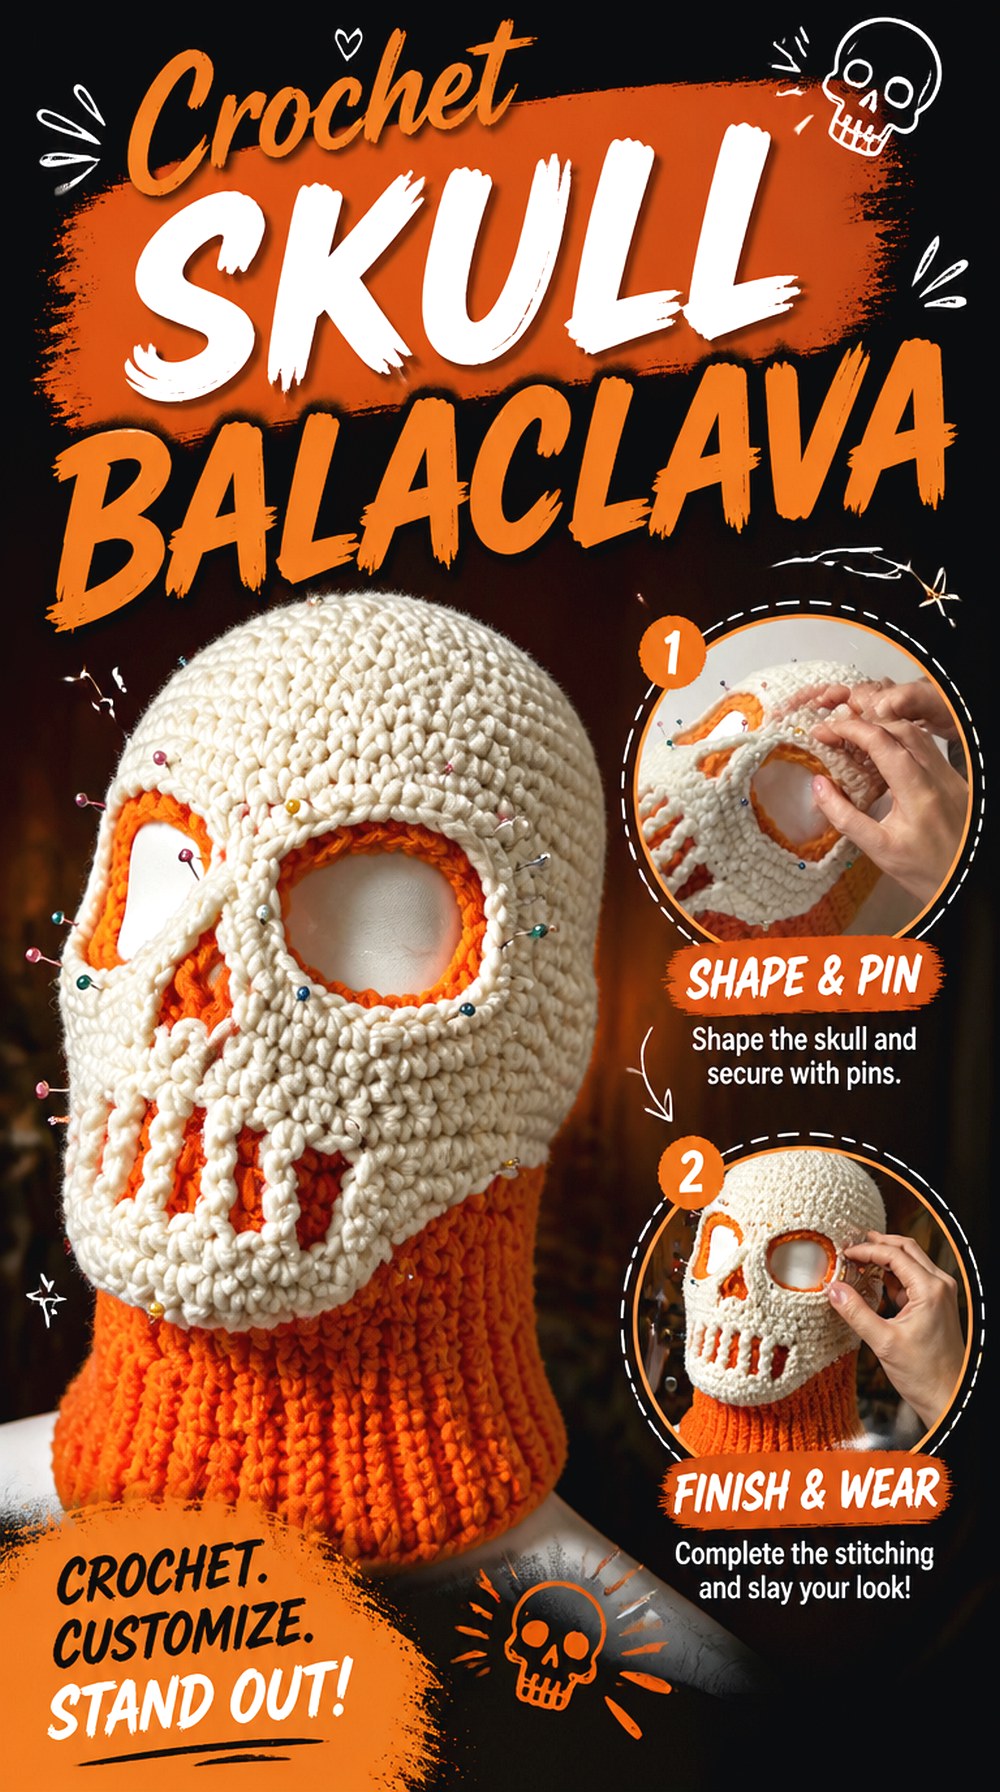
Alexandria Masse’s skull balaclava makes the skull part of the shape of the head covering instead of simply placing a motif on top. Large eye areas, the face opening, and the overall hood shape all contribute to the effect, making fit a much more important concern than it is for a scarf or square.
The tutorial also includes gradient-dye content, but that styling element is optional to the broader project idea. The more important decision is whether you want a close, face-framing skull design or a looser accessory such as a bandana or beanie. This version creates the strongest face transformation among the wearables in the list.
Fit the Eye Area Before Final Assembly
Eye openings must line up with the actual wearer rather than looking correct only when the balaclava lies flat. Check the position during construction whenever the tutorial makes that possible.
If the openings interfere with vision, the piece needs adjustment before decorative perfection becomes a priority. A skull face covering should never be treated as successful if the visual design compromises safe visibility.
Dense Fabric Trades Drape for Coverage
A balaclava generally needs more body than a lace bandana, but a very rigid fabric can feel different around the face and neck. Follow the creator’s material guidance and judge the actual fabric rather than substituting yarn based only on color.
A yarn with significantly different thickness or elasticity may change the fit, eye placement, and overall proportions even when the skull design still looks correct.
Treat the Gradient as Styling, Not Structure
The gradient shown in the tutorial gives the project a distinctive finish, but it does not have to be the reason you choose this construction. A solid color can keep attention on the skull itself, while a gradient makes the color transition another major feature.
If changing yarn or dye treatment, confirm that the fiber and process are compatible rather than assuming every yarn accepts the same finishing method.
Original Tutorial and Creator Credit
Creator: Alexandria Masse
7. Crochet Openwork Skull Bandana

This skull bandana from TEJIENDO CON PILY A LA VANGUARDIA uses the motif in a triangular headscarf format. Compared with a beanie or balaclava, the finished piece leaves much more of the head uncovered and lets the skull design work through the open spaces of the crochet.
That makes it useful for readers who want a lighter visual treatment of the theme. The triangle also provides a natural focal area for the skull while the ties control how the bandana sits. Because hair is visible through and around the crochet, the wearer’s hair color and the yarn color together can influence how clearly the motif appears.
The Background Becomes Part of the Skull
Openwork skulls are affected by whatever shows through them. A dark motif against dark hair can appear subtler than the same piece against a contrasting background.
Before deciding that the skull needs additional outlining, try the finished or partly finished bandana against the intended background. The negative spaces may become much clearer when it is actually worn.
Tie Length Changes the Way the Triangle Sits
A head bandana is not fitted only by the central triangle. The ties determine where the piece sits and how firmly it stays in place.
Use the creator’s construction as the reference and check the fit before assuming the same proportions suit every wearer. If adapting the size, preserve enough room for a comfortable tie without making long loose cords unsuitable for the intended situation.
Original Tutorial and Creator Credit
Creator: TEJIENDO CON PILY A LA VANGUARDIA
8. Crochet Narrow Repeating Skull Scarf
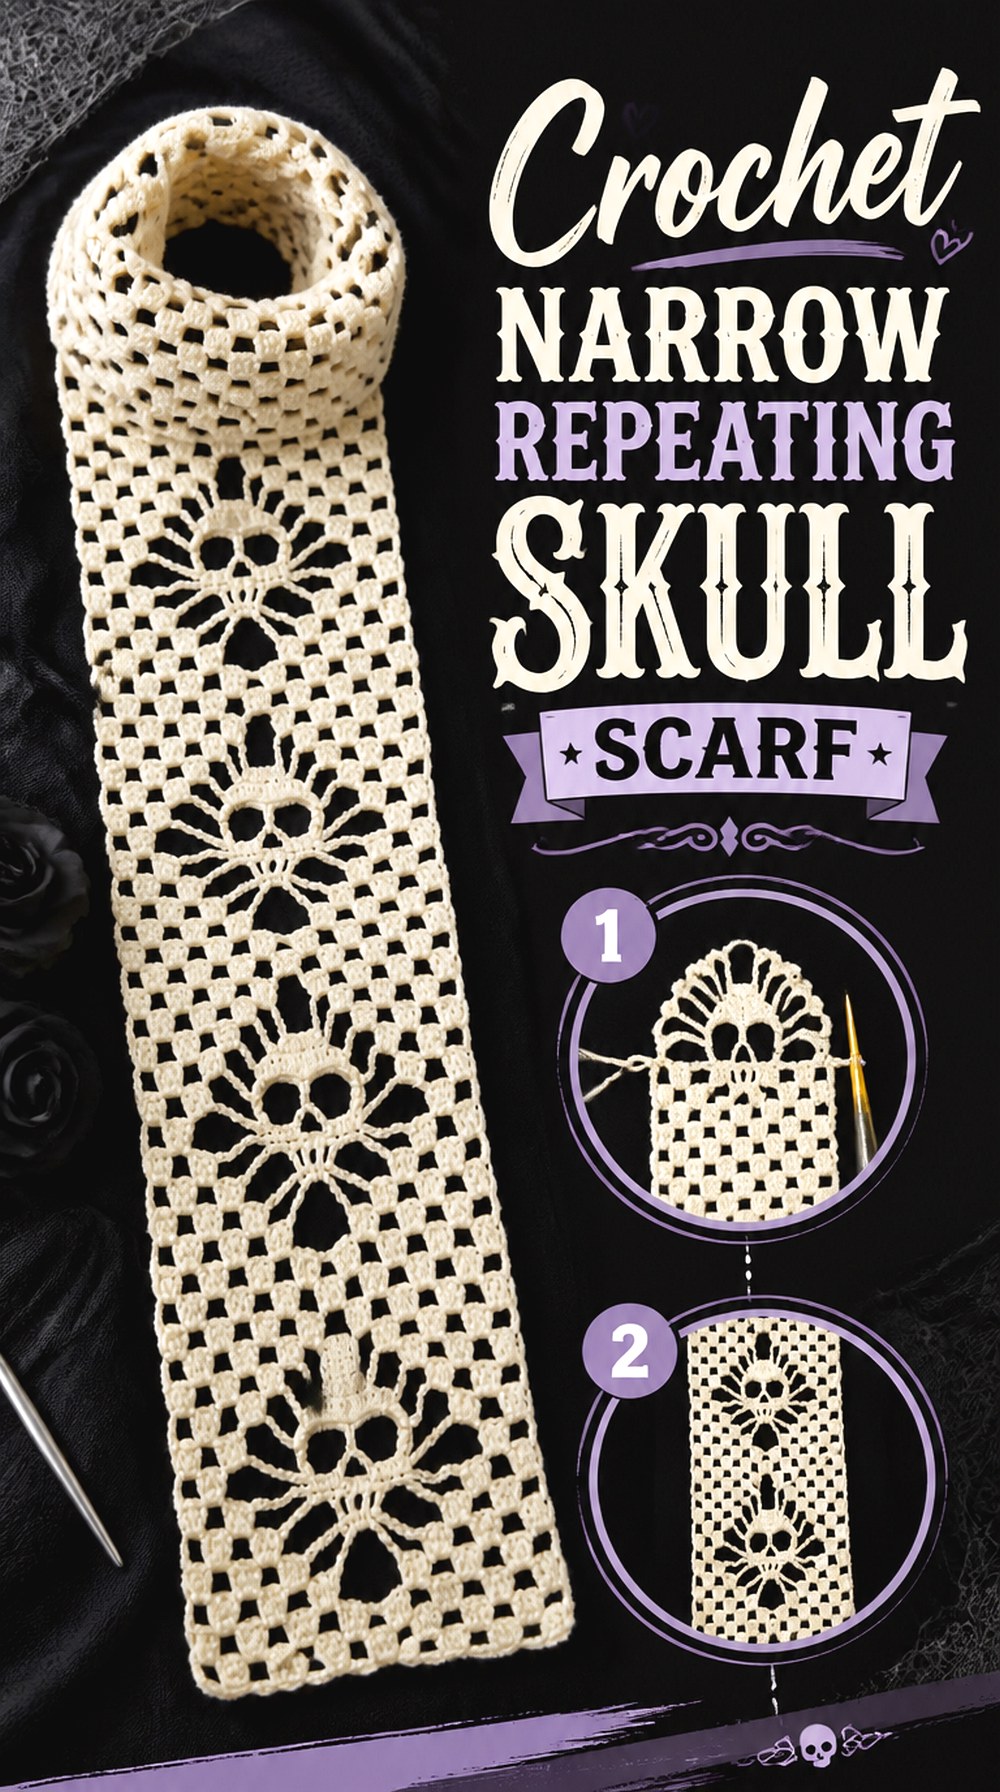
Fiber Spider’s narrow skull scarf uses repeating skulls in a long accessory, giving the motif a strong vertical rhythm. The narrower shape keeps the skull pattern prominent instead of surrounding it with a large field of plain crochet.
A particularly useful design detail is motif direction. The creator’s construction addresses the problem of skulls appearing upside down on one end of a conventional end-to-end scarf. That makes this project valuable for readers who care about how repeated directional images look once a scarf is actually worn rather than only while it is being crocheted flat.
Motif Orientation Is the Main Planning Decision
Skulls have an obvious top and bottom, so a directional repeat needs more planning than stripes or geometric texture. Consider how both hanging ends will look before committing to a construction method.
Fiber Spider’s tutorial is useful specifically because the finished scarf is planned so the skulls can remain correctly oriented. Keep that goal in mind if you adapt the length or joining point.
A Narrow Width Keeps the Repeats Prominent
This scarf puts more emphasis on the skull pattern than on broad warmth or blanket-like coverage. That gives it a different styling role from a wide wrap.
If you enlarge the width substantially, consider whether the skull repeat still feels appropriately scaled. A narrow motif can become visually lost if surrounded by too much extra fabric that was not part of the original design.
Check Length Against How You Wear Scarves
A scarf intended to hang long has different requirements from one that will be wrapped several times around the neck. Before extending or shortening the repeats, think about the finished styling rather than choosing length only by the number of skulls you want.
Remember that blocking, yarn behavior, and the way the scarf hangs can alter the apparent length after finishing.
Original Tutorial and Creator Credit
Creator: Fiber Spider
9. Crochet Skull Triangle Shawl

Mamie Crochet expands skull openwork into a triangular shawl or scarf, creating more coverage and drape than the narrow scarf. The skulls become part of a growing triangular field, so the finished piece reads as both an accessory and a repeated lace design.
This is a useful choice if you want the theme to feel integrated rather than placed as a single graphic. It also creates more styling options across the shoulders or around the neck. Because the fabric covers a larger area, yarn behavior becomes more noticeable: a soft draping result and a firm structured one can look very different even when the skull openings are equally clear.
The Triangle Changes How the Motifs Fall
A triangular shawl distributes fabric from a central area toward two ends. That means the skulls will be seen at different angles when the piece is wrapped or draped.
Look at the tutorial’s finished styling before deciding where you want the strongest skull visibility. A motif that looks centered while the shawl is flat may move toward the shoulder or side when worn.
Drape Matters More Here Than on a Coaster
A skull coaster benefits from flat stability, while a shawl needs to move comfortably around the body. Yarn substitutions should therefore be judged for drape as well as stitch definition.
If the fabric becomes too stiff, the triangle may stand away from the body. If it becomes extremely loose, the skull openings may stretch more than expected and lose some visual definition.
Border Weight Can Change the Hang
Any finishing added around a shawl affects more than appearance. A heavier border can pull the perimeter downward and alter how the main skull field sits.
Before adding optional embellishment or a substantially different edging, consider whether the extra weight supports the desired drape. Follow the original tutorial when you want the demonstrated silhouette.
Original Tutorial and Creator Credit
Creator: Mamie Crochet
10. Crochet Allover Skull Blanket

Alextitia Tuto Crochet takes the skull motif to blanket scale, where repeated imagery becomes the dominant surface design. Instead of making separate skull squares and joining them later, the tutorial demonstrates a larger skull-patterned fabric, giving the finished blanket a more continuous look.
This option makes sense when you want repetition without patchwork seams between every motif. It also introduces different planning questions: overall width, repeat placement, yarn weight, finished fabric weight, and color consistency become more significant because the project covers a large area. A sample that looks light and flexible in a small section can feel considerably heavier when expanded into a full blanket.
Plan Repeats Before Committing to Width
A repeating skull design has its own internal spacing, so blanket width should be planned around the creator’s construction rather than guessed from a generic blanket dimension.
Preview enough of the tutorial to understand how the repeat fits into the larger fabric. If you intend to alter the size, use the creator’s repeat information instead of improvising stitch counts from the finished image.
Larger Fabric Magnifies Yarn Characteristics
The same yarn that feels insignificant in a swatch can create substantial weight when repeated across a blanket. Thickness, fiber, and drape therefore matter more at this scale.
If substituting yarn, make a representative sample and evaluate both the skull definition and the fabric’s hand. Also verify the yarn’s care instructions before committing to a large amount of material.
Keep Contrast Consistent Across the Field
A repeated skull blanket depends on the pattern staying readable over a large area. If you introduce many color changes, check that the skull shapes remain clear rather than disappearing in sections with similar values.
A limited palette can emphasize the graphic repeat, while more colors can make the blanket busier. Neither is automatically better; choose based on whether motif clarity or color variety is the priority.
Original Tutorial and Creator Credit
Creator: Alextitia Tuto Crochet
11. Crochet Skull Granny Square Pants

Crochet With Tiffany turns skull granny squares into a full pair of pants, making this one of the more construction-sensitive ideas in the collection. Individual skull panels have to become a wearable shape that moves around the hips and legs, so the motif cannot be considered separately from sizing and seams.
This is the project to compare with the cardigan if you like patchwork skull garments but want the motifs concentrated in a lower-body silhouette. Pants also place different stresses on joined crochet than a hanging blanket or decorative bag. Fit, stretch, rise, leg width, and the consistency of the squares all need attention before a large number of motifs are produced.
Square Size Has to Relate to Body Measurements
Do not choose the number of motifs simply because another pair of crochet pants uses that layout. Start with the tutorial’s sizing approach and compare it with the intended wearer’s measurements.
If a blocked square changes size, the effect multiplies across the panel. Several slightly oversized motifs can create far more unwanted width than one square suggests on its own.
Seams Carry More Stress in Pants
Joined squares around a garment move whenever the wearer walks, sits, or bends. That makes consistent joining especially important around areas that experience regular movement.
Inspect joins as the panels develop rather than waiting until the pants are complete. If one seam stretches far more than the surrounding fabric, correct the problem while the construction is still accessible.
Check Rise and Leg Length Before Repeating Panels
A comfortable waist width does not automatically guarantee a comfortable rise or preferred leg length. Evaluate those proportions separately.
If you want to alter the silhouette, determine where the tutorial allows adjustment rather than adding or removing skull squares blindly. A motif-based garment changes in large increments, so small fit corrections may need edging or construction adjustments instead.
Original Tutorial and Creator Credit
Creator: Crochet With Tiffany
12. Crochet Skull and Spider Garland

Pocket Yarnlings combines skulls with spiders in a Halloween garland, creating a display piece based on repeated small motifs rather than one large centerpiece. The alternating imagery gives the strand more visual variety than a row of identical skulls and makes the project distinctly different from a single appliqué.
A garland also introduces display considerations that do not matter for flat decor. The motifs need enough separation to remain recognizable when hanging, and the connecting strand should suit the width of the shelf, mantel, wall, or doorway where it will be used. Storage matters too because multiple small shapes can tangle if packed carelessly between seasons.
Alternating Motifs Break Up the Repetition
The skull-and-spider combination creates a rhythm across the strand. If you change the colors or add more motifs, preserve enough visual separation that the individual shapes do not blur together.
Before making a long garland, hang a short section. Viewing it vertically or across a wall gives a better sense of spacing than judging the motifs while they lie on a work surface.
Hanging Spacing Changes the Display
Closely packed motifs create a dense banner effect, while wider spacing makes each skull easier to identify from across a room. The right choice depends on the intended display area.
Also consider how the garland will be stored. Avoid fastening fragile embellishments where they are likely to catch on neighboring motifs, and coil the finished strand rather than compressing it into a tangled bundle.
Original Tutorial and Creator Credit
Creator: Pocket Yarnlings
13. Crochet Colorwork Skull Beanie
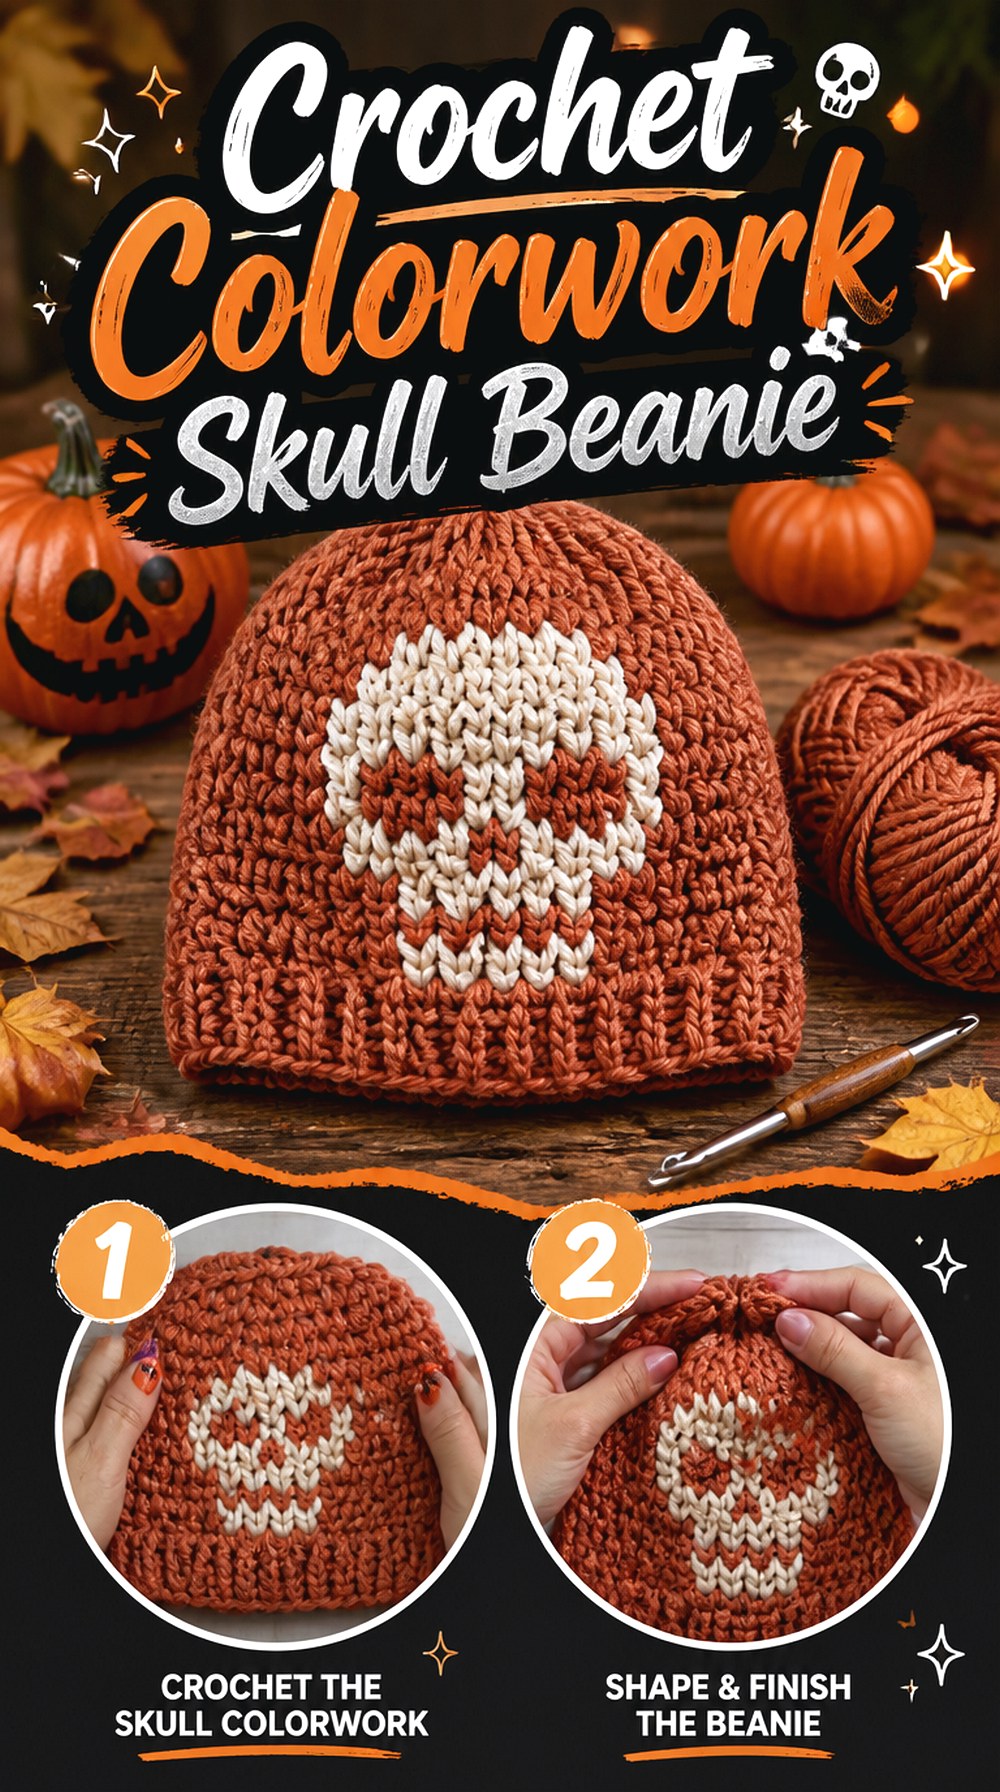
Designs by Phanessa incorporates skull imagery into a fitted beanie, giving you a closed headwear option that is substantially different from the open bandana and full balaclava. The skull is part of the hat’s colorwork, so motif tension and hat stretch have to cooperate.
This project works well for readers who want a recognizable skull accessory without covering the face. Because a beanie narrows toward the crown, motif placement needs to be planned within the straighter section of the hat where the image has enough room to read. The edge or brim then has its own job: holding the hat comfortably in position.
Colorwork Tension Controls Head Stretch
A skull can look crisp while the hat is flat but still make the fabric too tight if the carried or changed colors restrict stretch. Compare the patterned area with the rest of the hat as you work.
The goal is not to make the motif section dramatically firmer than the surrounding fabric. Follow the creator’s technique for managing the colorwork instead of pulling unused yarn excessively tight.
Center the Skull Before Crown Shaping
The strongest part of a skull image generally needs enough uninterrupted fabric to remain recognizable. As the crown begins to decrease, the hat’s geometry changes.
Review where the tutorial places the skull relative to the brim and crown. If adapting the motif position, avoid moving key facial details into an area where the narrowing fabric will distort them.
The Lower Edge Still Has to Fit
A dramatic skull motif does not compensate for a brim that slips or feels overly tight. Judge the lower edge independently from the decorative section.
When substituting yarn, compare stretch and recovery instead of relying only on a similar visual thickness. The same stitch count can behave differently in fibers with different elasticity.
Original Tutorial and Creator Credit
Creator: Designs by Phanessa
14. Crochet Lace Skull Doily
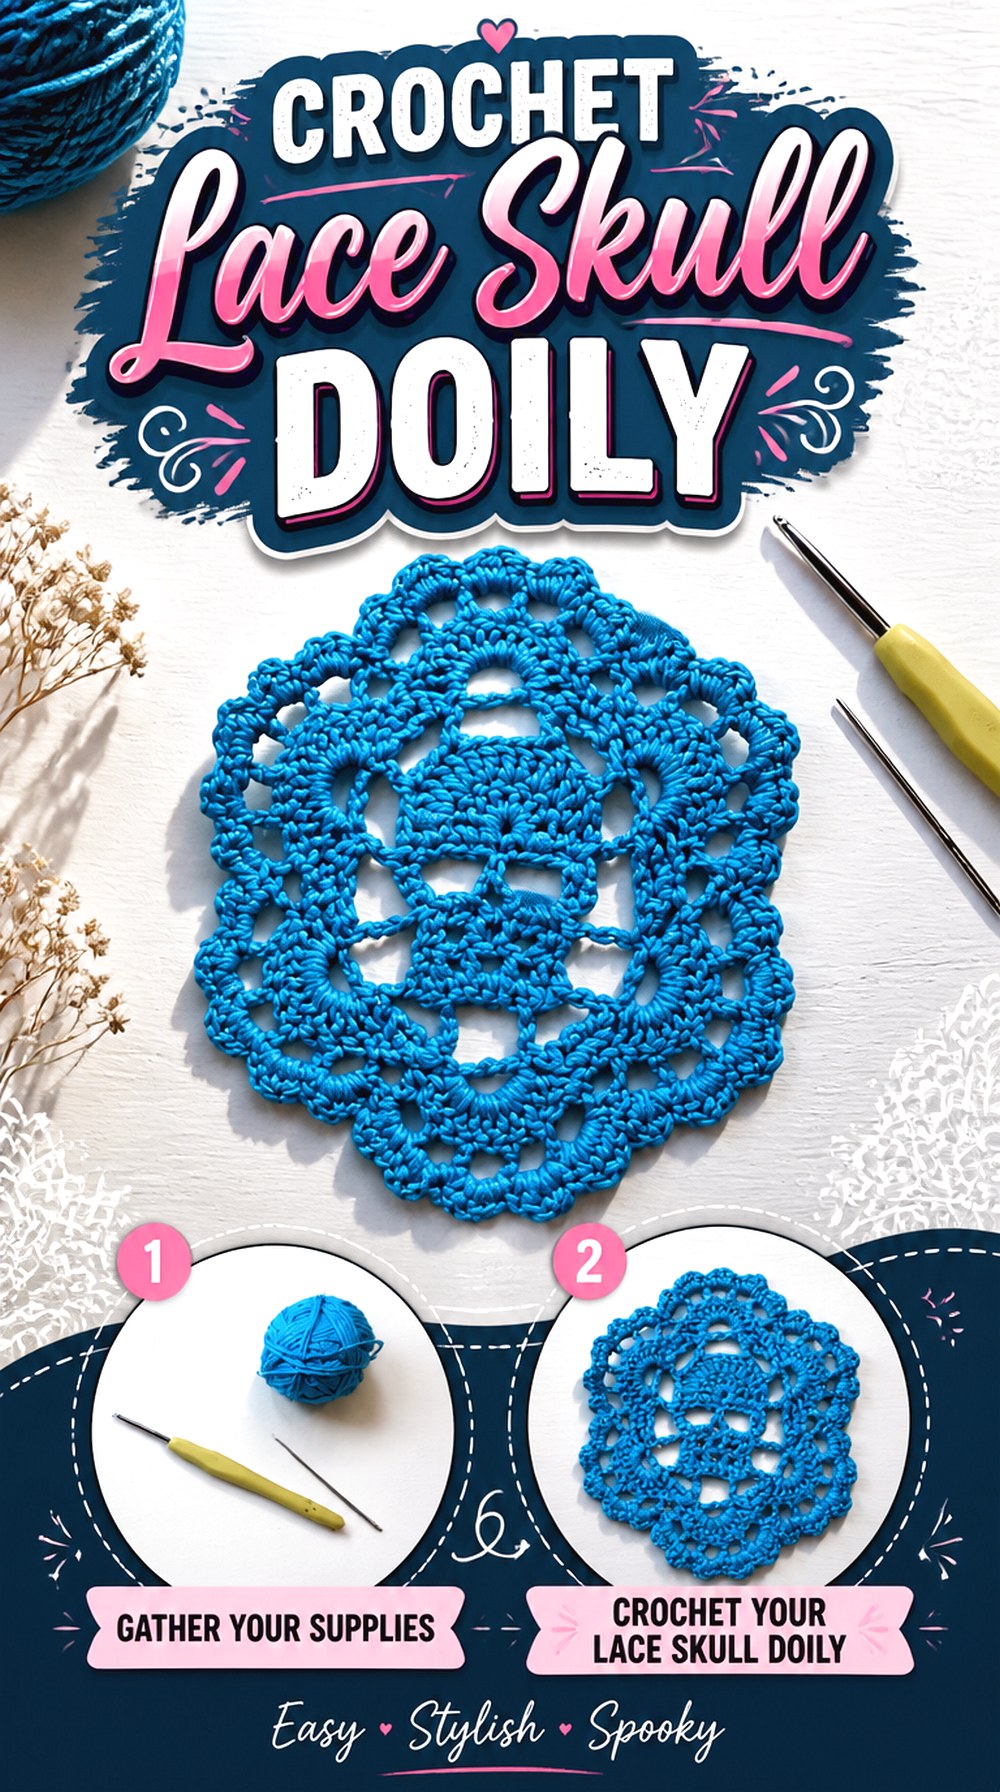
Someday Sarah’s skull doily uses open crochet to turn the face into a flat decorative lace piece. Unlike the coaster, this project is more about display and visual detail than supporting a cup, and its open spaces make blocking especially important to the final appearance.
The doily can work as a tabletop accent, seasonal display, or motif inspiration for a larger decorative arrangement. It also demonstrates how dramatically skull character can change when the design moves away from thick graphic colorwork and into lace. The result feels more delicate even though the imagery remains unmistakably gothic.
Blocking Defines the Lace Shape
Openwork often looks less organized immediately off the hook than it does after finishing. The skull’s perimeter and internal openings may need careful shaping to show the intended outline.
Use a blocking method compatible with the chosen fiber and do not assume every yarn tolerates the same heat, steam, or washing treatment. Consult the yarn’s care information before applying any finishing process.
Thread or Yarn Can Change the Scale Dramatically
A lace skull made in fine material and the same concept made in thicker yarn can become very different objects. The larger version may move beyond doily scale and become better suited to wall display or another decorative use.
If you intentionally change material size, make a sample before assuming the finished dimensions will remain close to the tutorial’s result.
Original Tutorial and Creator Credit
Creator: Someday Sarah
15. Crochet Tapestry Skull Fingerless Gloves

Weaving Wyrd Studio uses tapestry crochet to place skull imagery directly into fingerless gloves. The project combines a highly visible hand motif with a small fitted accessory, so colorwork tension becomes particularly noticeable.
These gloves differ from the skull earrings because the motif sits on a moving piece of fabric rather than hanging freely. They also differ from the beanie because the hands repeatedly flex and rotate. For that reason, the finished gloves need to be judged in use, not only while lying flat. A skull that looks perfect on the table should still read clearly when the hand is relaxed.
Keep Colorwork Tension Consistent Across Both Gloves
A pair should feel similar even if one glove was crocheted days after the other. Compare the fabric stretch and overall width periodically as the second piece develops.
If one glove’s colorwork is noticeably tighter, do not rely on blocking alone to correct a major discrepancy. Consistency during construction gives the pair a better chance of fitting and moving similarly.
Place the Skull Where the Hand Displays It
A skull motif has the strongest impact when it sits on the visible area intended by the design. Rotation around the hand can make the image disappear toward the side.
Before finishing, try the glove on and check where the skull rests naturally. Use the tutorial’s orientation as the reference rather than centering the image according to the flat piece alone.
Fingerless Openings Need Movement as Well as Fit
A glove can technically fit around the hand but still restrict comfortable movement near the thumb or finger opening. Test flexing and normal hand positions before treating the fit as final.
If you are adapting the dimensions, preserve enough mobility for the intended wearer rather than sizing only from circumference.
Original Tutorial and Creator Credit
Creator: Weaving Wyrd Studio
16. Crochet Skull Granny Square Shoulder Bag

Loopara turns skull granny squares into a complete bag, giving the motif an everyday accessory format rather than leaving it as a standalone block. The joined squares create the bag’s visual structure, and the strap converts the patchwork panel into something meant to be carried.
This project is useful if you already like the modular skull-square idea but want a tutorial focused on what happens after the motifs are complete. Joining, edge finishing, opening shape, and strap attachment become just as important as the skull itself. It is also a good contrast with the filet tote later in the list, where the skull is worked into continuous openwork rather than separate squares.
Joined Squares Create Design and Structure Together
The seams remain visible enough to influence the final bag’s appearance, so square consistency matters. Lay the motifs out in their final orientation before joining.
Check that the skulls face the intended direction and that the corners align without forcing one square to stretch significantly farther than another. Correcting size differences first produces cleaner assembly.
Reinforce the Strap Area for the Intended Use
A bag strap concentrates force at its attachment points. Before carrying the bag, inspect how the handle or strap connects to the crocheted body.
Do not make unsupported claims about how much weight the bag can hold. If you intend to carry more than light items, consider whether the tutorial’s structure, your chosen yarn, and any reinforcement are appropriate for that use.
Decide on a Lining From the Opening Size
Joined granny squares may leave spaces that are perfectly acceptable for decorative or larger items but less useful for small loose belongings.
Look at the finished fabric against the things you expect to carry. A lining or inner pouch can change practicality without changing the exterior skull design, but it also adds sewing and finishing work.
Original Tutorial and Creator Credit
Creator: Loopara
17. Crochet Skull Patchwork Cardigan

Shyler crochets expands skull granny-square construction into a full open-front cardigan. This creates a very different planning problem from the bag or pants because motifs must form body panels, sleeves, shoulders, and front edges while still producing a wearable garment.
The cardigan is one of the strongest choices if you want the skull theme to dominate an outfit rather than function as a small seasonal accent. It also gives you room to balance skull squares with other colors or less detailed areas. Before producing many motifs, however, decide how the garment should fit and where the skulls should appear when viewed from the front and back.
Map the Skull Squares Before Joining Panels
Do not decide motif placement one seam at a time. Arrange the intended front, back, and sleeve layouts first so you can see whether one area becomes visually crowded.
Orientation matters as well. A skull square that rotates unintentionally on a sleeve or back panel will be much harder to correct after the cardigan is assembled.
Shoulder and Sleeve Weight Can Build Quickly
A full motif garment contains considerably more yarn than a small square or scarf. The finished weight can affect shoulder stretch and how long sleeves hang.
If you substitute a substantially heavier yarn, make a representative panel or sample before committing to the entire cardigan. The issue is not just gauge; the garment also has to feel comfortable when its total fabric is supported by the shoulders.
Fit Before the Final Edging
Edging can tidy an open front, cuffs, and hem, but it should not be expected to rescue a major sizing problem. Check body width, sleeve length, and arm movement while corrections are still practical.
When adjusting a square-based cardigan, remember that adding or removing a full motif can create a large change. Smaller fit refinements may need to come from joining or edging choices supported by the creator’s construction.
Original Tutorial and Creator Credit
Creator: Shyler crochets
18. Crochet Decorative Sugar Skull

Shelen Crochet’s sugar skull is a decorative skull project with colorful embellishment rather than a plain anatomical or Halloween-style face. The extra surface details give it a different visual purpose from the small amigurumi skull: the decoration is a central part of the finished identity.
This is a good choice if you enjoy color placement and ornamental finishing as much as the crochet structure itself. It can be displayed as a standalone decorative object rather than adapted into a garment or bag. Because the design is specifically presented as a Day of the Dead sugar skull, it is also worth treating that identity distinctly rather than using “sugar skull” as a generic label for every colorful Halloween skull.
Decorative Details Need a Clear Focal Order
When a skull includes several colors and embellishments, not every feature needs equal visual emphasis. Decide whether the eye areas, forehead, flowers, or surrounding details should command attention first.
If you customize colors, compare the composition as a whole before permanently attaching additional decoration. Too many equally strong accents can make the facial structure harder to read.
Keep Calavera Styling Distinct From Generic Halloween Skulls
This project is explicitly presented by the creator as a sugar-skull/Day of the Dead design. That context is different from simply adding neon colors to a Halloween skeleton motif.
If you adapt the decoration, it is reasonable to explore your own palette while still describing the source accurately. Avoid treating culturally specific imagery as interchangeable with every spooky-season skull.
Original Tutorial and Creator Credit
Creator: Shelen Crochet
19. Crochet Skull Face Mask
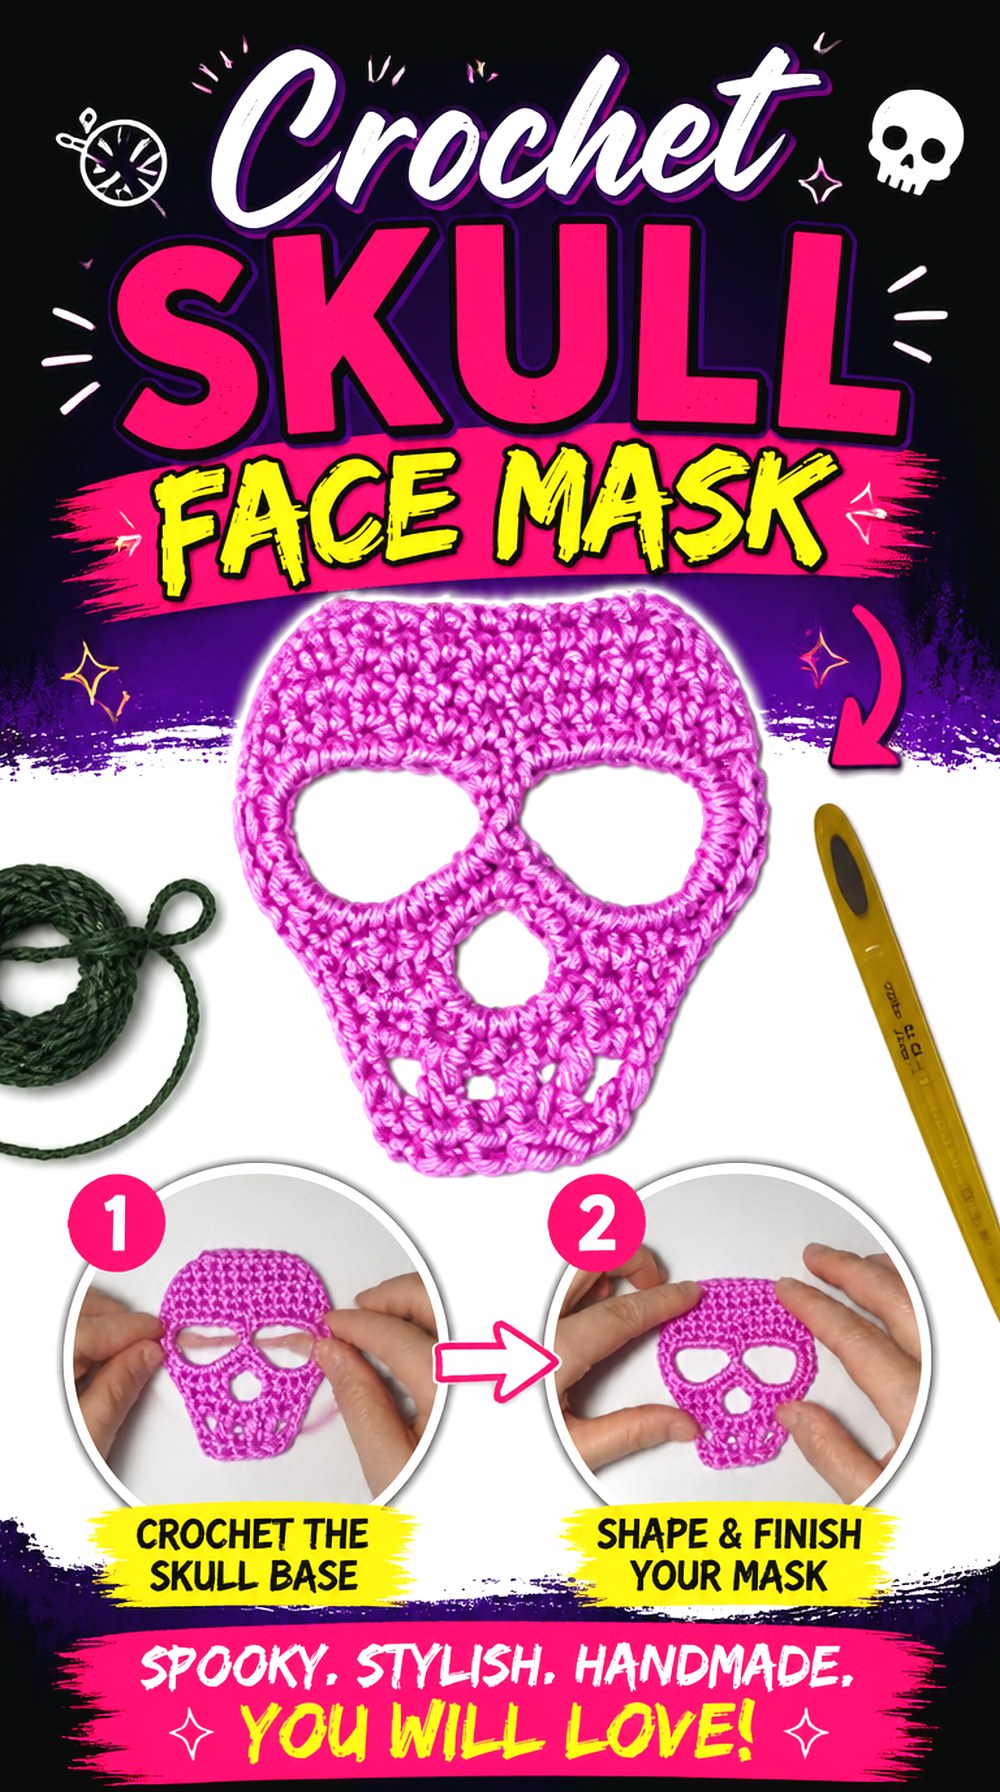
Knit and Crochet with Bingogaga offers a crochet skull mask focused directly on the face. Unlike the balaclava, which covers much of the head, this project centers the skull effect on a mask format, making the openings and positioning especially important.
This is a costume-oriented choice rather than ordinary cold-weather headwear. The skull image needs to line up with the wearer’s facial features well enough to read correctly, but visibility and comfort must take priority. It also should not be confused with protective respiratory or safety equipment; the value here is decorative crochet and costume styling.
Eye and Nose Openings Are Functional Features
The openings cannot be judged only by symmetry on a flat table. Test the mask on the intended wearer before final use and make sure the field of vision remains adequate.
If the crochet shifts while moving, review the fit rather than tightening it indiscriminately. A decorative mask that obstructs vision is not suitable for situations requiring clear awareness of surroundings.
Test Comfort Before Wearing It for an Event
Face contact can feel different after several minutes than during a quick fitting. Check whether yarn edges rub, whether the mask stays in place, and whether normal breathing is unobstructed.
Do not use a crochet costume mask as protective equipment. If it will be worn outdoors, near traffic, or in a crowded environment, visibility and secure but comfortable positioning are especially important.
Original Tutorial and Creator Credit
Creator: Knit and Crochet with Bingogaga
20. Crochet Filet Skull Tote
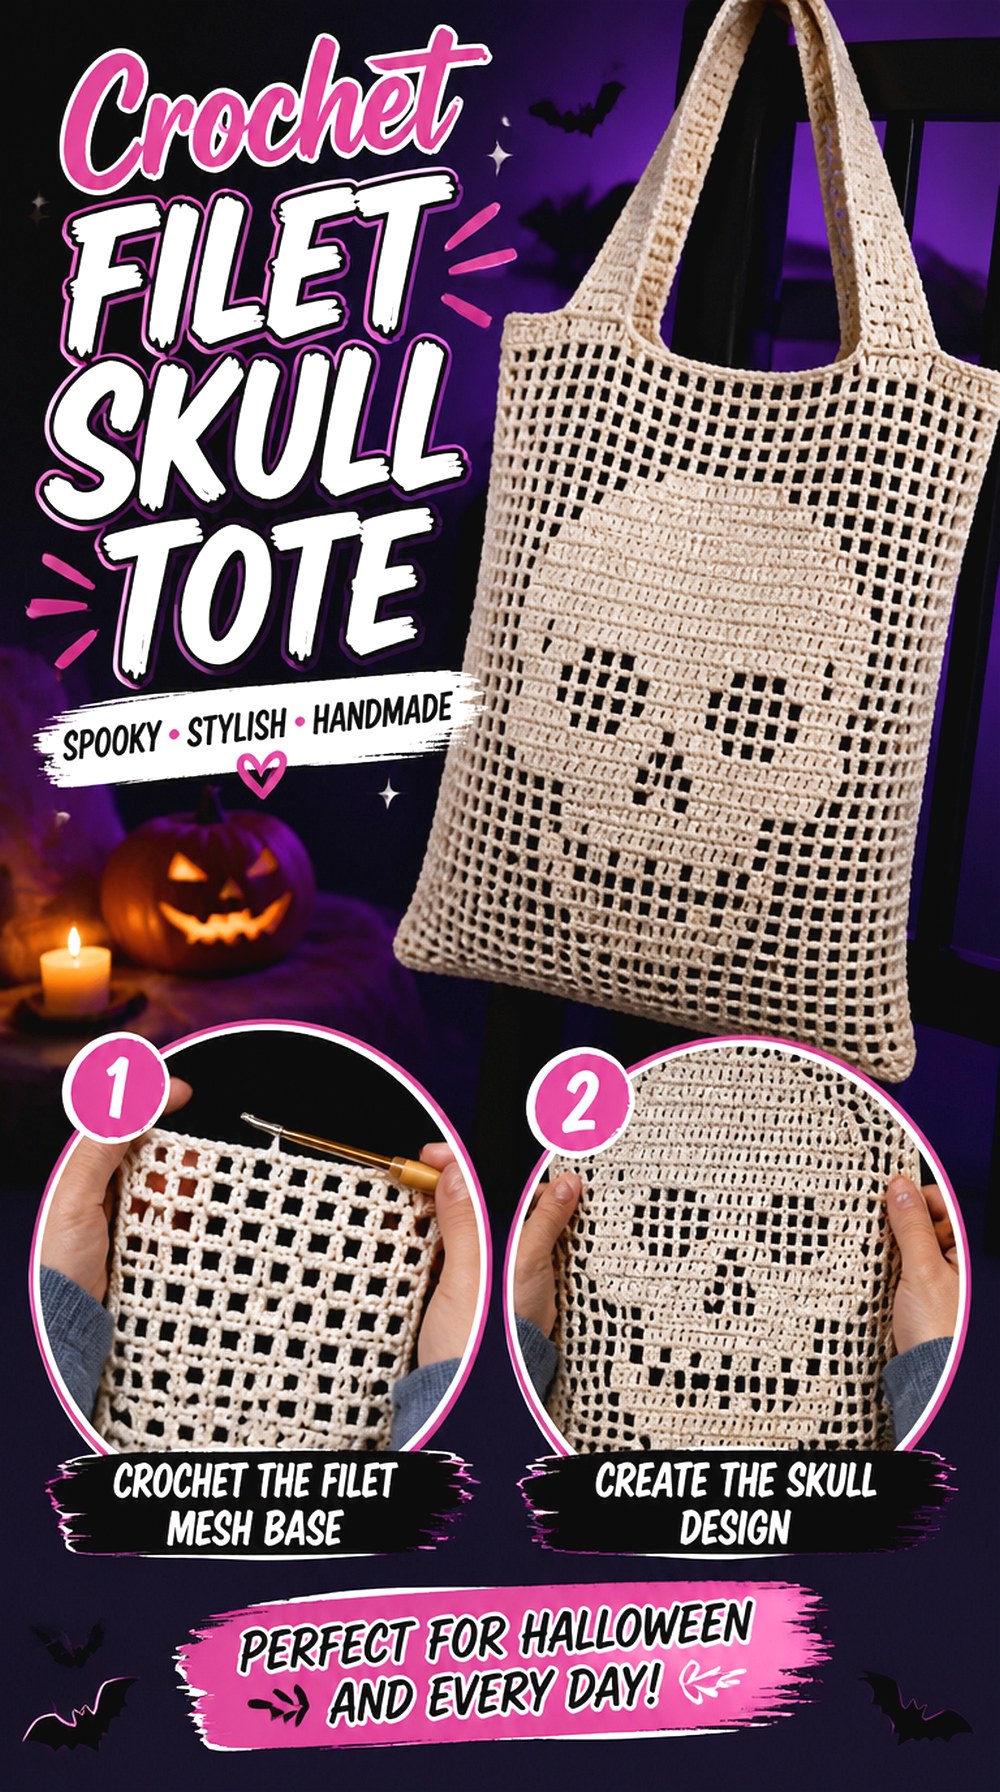
Totally Fierce Crochet Channel uses filet crochet to build a skull directly into a tote instead of constructing the bag from separate granny squares. The solid and open sections create the image across a continuous bag body, giving it a cleaner graphic surface than patchwork construction.
The tutorial also covers the bag through its handles and finishing, including lining content. That makes this an especially useful final comparison with the skull granny-square bag. Both create functional carrying pieces, but the filet version relies on negative space and one continuous fabric direction rather than multiple joined motifs.
Filet Openwork Makes the Lining a Visual Choice
A lining can do more than stop small belongings from pressing through the open areas. Its color becomes the background visible through the skull design.
A contrasting lining can make the skull easier to read, while a similar color can create a subtler effect. Decide whether you want the openwork itself or the contrast behind it to dominate before choosing fabric.
The Handle Area Takes Different Strain From the Body
The filet skull is the visual center, but the handles determine how the bag is carried. Check the transition between the main fabric and the handle area carefully.
Before loading the finished tote, inspect for excessive stretching at those points. Avoid assuming a decorative crochet bag has a specific weight capacity unless the creator has explicitly tested and stated one.
Finishing Can Sharpen the Skull Grid
Openwork benefits from an even final shape because irregular stretching can alter the proportions of the skull cells. Follow the tutorial’s finishing guidance and the yarn’s care requirements.
When blocking or shaping, work across the whole tote rather than stretching only the skull area. The goal is a balanced bag body with a clear motif, not an enlarged skull sitting inside distorted surrounding fabric.
Which Crochet Skull Style Makes the Most Sense?
For maximum adaptability, start with the graphic granny square or one-piece appliqué because both can be evaluated before you commit to a large finished object. The coaster, earrings, amigurumi, doily, and garland make more manageable choices when you want the skull itself to remain the main feature.
Choose the scarf or shawl when drape is important, and the beanie, gloves, balaclava, pants, or cardigan when fit needs equal attention with the motif. The two bags offer a particularly useful construction comparison: the granny-square bag emphasizes joins and modular planning, while the filet tote creates the skull through a continuous openwork surface. For the strongest decorative statement, the blanket and full cardigan place repeated skulls across the largest visible areas.
Conclusion
These 20 crochet skull ideas show why choosing the construction matters more than simply choosing a favorite skull image. A granny square gives you modular flexibility, an appliqué creates an easy accent, filet and lace rely on negative space, tapestry creates firmer graphic fabric, and amigurumi turns the skull into a three-dimensional object.
For a first small project, compare the coaster, appliqué, doily, earrings, or amigurumi. For a larger statement, look at the blanket, pants, cardigan, shawl, or bags. Wearables deserve an extra fit check, while openwork bags and decor need thoughtful finishing and background contrast. Once you choose the format, use the original creator’s tutorial for the exact construction details.
Frequently Asked Questions
Can I replace a plain granny square with a skull granny square in any project?
Not automatically. Two squares can look similar while finishing at different dimensions or having different edge structures. Make and finish one skull square first, then compare its blocked width, height, corner placement, and edge stitch distribution with the square used in the intended bag, blanket, or garment. If those features do not align, substitution may require additional planning rather than a direct one-for-one swap.
What yarn makes crochet skull details easiest to see?
There is no single fiber or weight that is ideal for every skull project. Clear stitch definition and enough contrast between the skull and its background generally make graphic details easier to read. A firm yarn may help a bag or amigurumi hold shape, while a softer yarn may suit a shawl better. Start with the tutorial’s recommended material range and judge any substitute for both appearance and the needs of the finished object.
Should skull granny squares be blocked before I join them?
Blocking can be particularly useful when several motifs must line up in a garment, blanket, or bag. Compare the squares after they have been finished consistently so you know their realistic dimensions before joining. Blocking should refine the shape rather than force noticeably different motifs into matching sizes. Always use a method appropriate for the fiber and follow its care instructions.
How can I keep skull colorwork from puckering?
Puckering often indicates that yarn carried across or behind the work is restricting the fabric. Avoid pulling those strands tighter simply to make the back look neat. Compare the patterned section with the surrounding crochet as you work and follow the creator’s demonstrated color-management technique. If the skull panel loses substantially more stretch than the rest of a hat or glove, address the tension before completing the entire project.
When is a lining useful in a crochet skull bag?
A lining becomes especially useful when the bag has open granny-square joins or filet spaces and you want to carry small loose items. It can also affect the design visually because the lining color may show through the skull openings. A lining is not mandatory for every decorative bag, but it is worth planning before final assembly so its placement, opening, and strap area work with the crochet rather than being added as an afterthought.
What should I check before wearing a crochet skull mask or balaclava?
Check visibility, breathing room, comfort, and whether the piece stays in position during normal head movement. Eye openings should work for the actual wearer, not simply look symmetrical while the crochet is flat. Avoid long or loose elements that could create an additional hazard. A crocheted costume mask or balaclava is decorative clothing, not protective respiratory or safety equipment, so it should never be relied on for that purpose.

